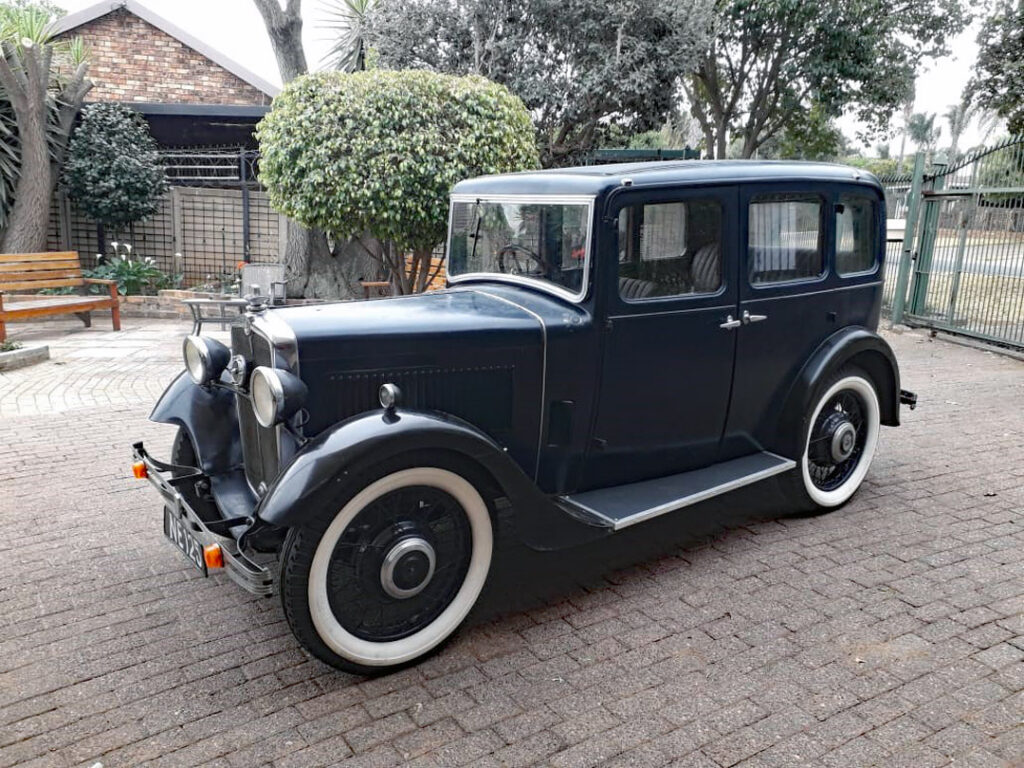
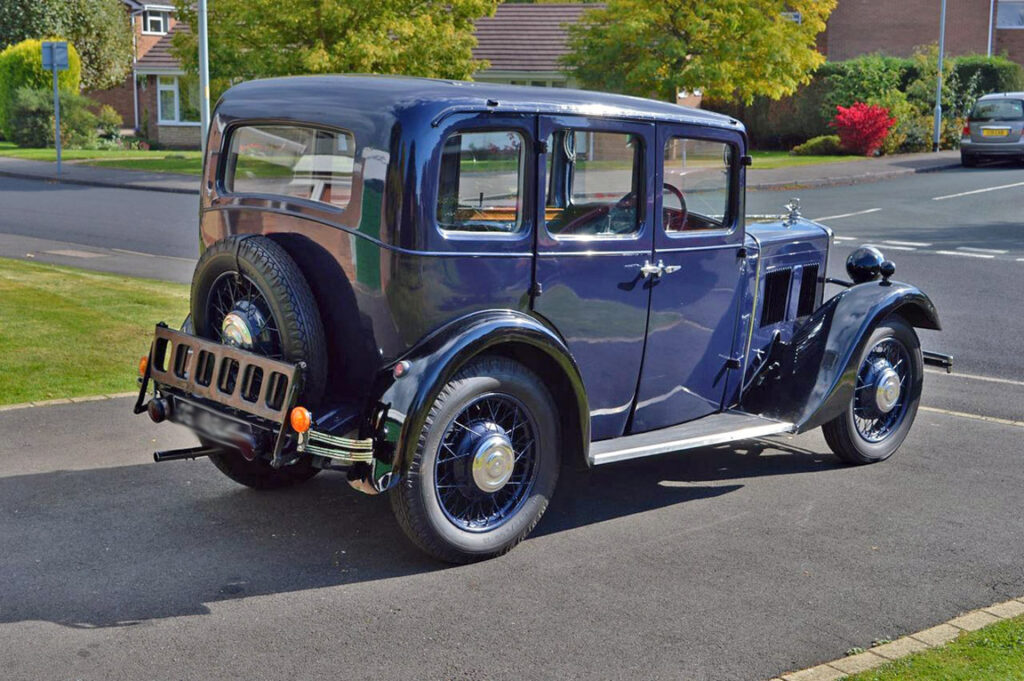
Sandstone’s 1933 Morris 10 Keeping its ageing patina
Original text and pics by Sandstone Estates Some editing by Axel von Tramp
The recent article (https://oldcars.net.za/blog/2025/03/22/1933-morris-ten/ – ed.) on the Morris 10 brought to mind a restoration, that we did at Sandstone, of a similar car. Our car, which we acquired from a deceased estate in Estcourt, was originally thought to be a 1934 example. Since then we have established that our vehicle’s chassis number, 2673, identifies it as a 1933 model and not a 1934 as originally thought.
This is a further – well preserved and highly original – vehicle from the same owner, Dennis Pietersen, as our 1935 Ford V8 Bakkie that remains as yet unrestored.
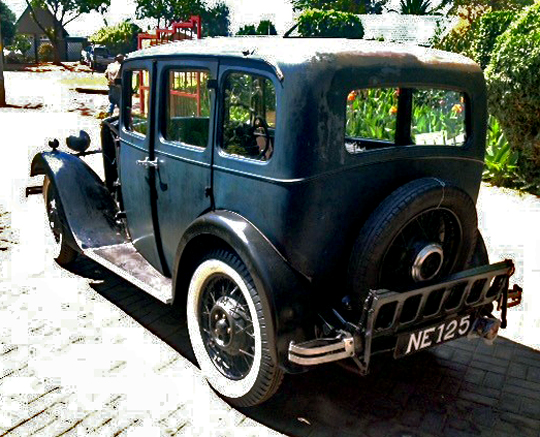
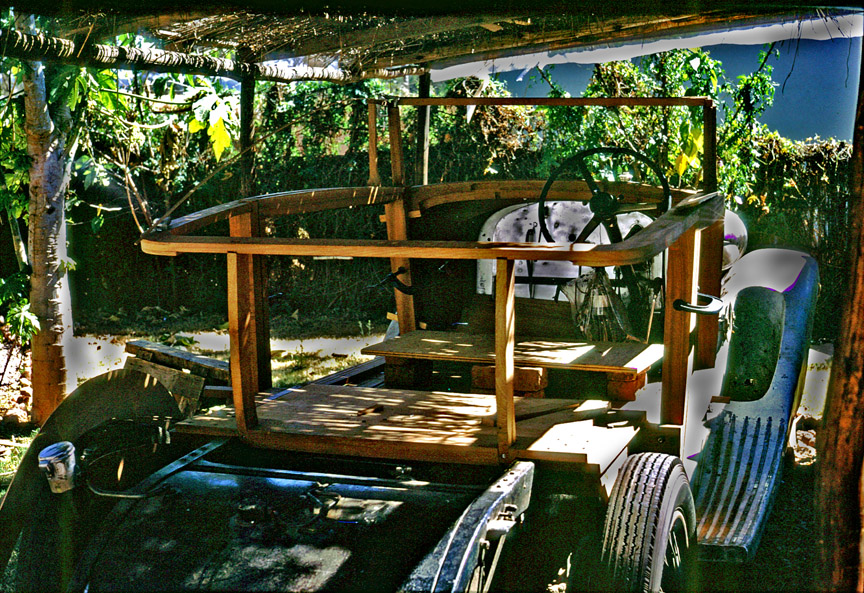
As rescued
Up on blocks, slap in the entrance to his workshop, stood the Morris. Dennis was reticent about it and didn’t encourage interest. Beyond the fact that it had belonged to his late father, and had been driven in to its current spot after his death, he would say very little about it. And would get really annoyed if one even hinted at his selling it.
One can only speculate how long it had stood there, by the turn of the last century, when Dennis himself passed away or how many “City” collectors – scenting a bargain and turning up with cash – had been sent off with Anglo Saxon curses ringing in their ears.
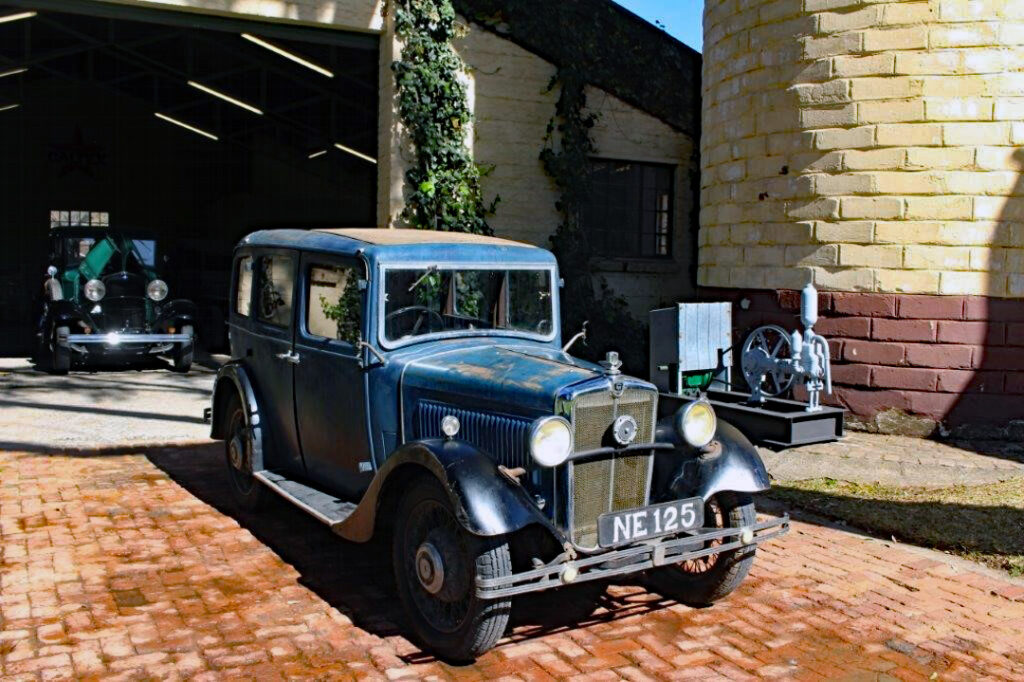
“Before”
Tom Kirkland, who started the restoration in 2016, takes up the story: While I have been a Volunteer, working at Sandstone Estates over the past 11 years, I have always admired this little Morris. It was parked in the sheds, among redundant tractors and farm implements, but I considered it eminently worth restoring. I could not detect any rust and all parts appeared to be present.
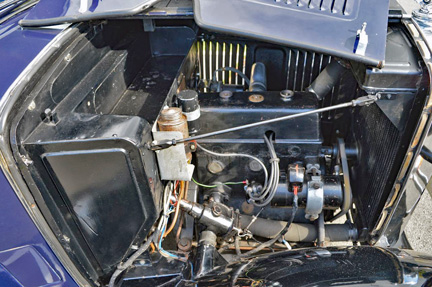
Last year Sandstone brought it up to Johannesburg for me to work on at home. Now that I have been able to strip it down, I have found that most parts are hardly worn. The speedometer shows a mere 25,000 miles. That seems to be its true mileage. I have now found that the motor’s water chambers need a good flushing out; whereafter it can easily be re-built with light honing, new pistons, rings and bearings.
The diff and gearbox will be checked but they appear to be in good order with no oil leaks. The radiator and fuel tank have been checked. The radiator will be re-cored, the fuel tank has been cleaned and a bad dent in it will hopefully be straightened out. The brake system was easily repaired with new linings and rubber seals. Wheel bearings are still firm and just need to be re-packed with fresh grease. Its two electric Trafficators are the only items that are missing. Can anyone please help find these because we never could? (Leads to: daver@sandstone.co.za – ed) The next major tasks will be the upholstery and a good paint job for the body work. In the end that was not done; as you will see.
Up to now most parts have been cleaned and the engine, gearbox, and differential are presently at an engineering works. Soon, therefore, it will all need to be re-assembled – over the next year or so. Presently the old-style ‘Knee-Action’ shock absorbers are proving to be quite a challenge but I’m sure we’ll get them working again.
Chapter two: Sadly, Tom Kirkland became unwell and was unable to complete the restoration. There were also various issues with the engine that remained unresolved until quite recently. As all classic car enthusiasts will know there are always many “experts” but sadly, without Tom, we ran into difficulties with completing a satisfactory rebuild of the engine. The project was shelved as the COVID pandemic hit South Africa.
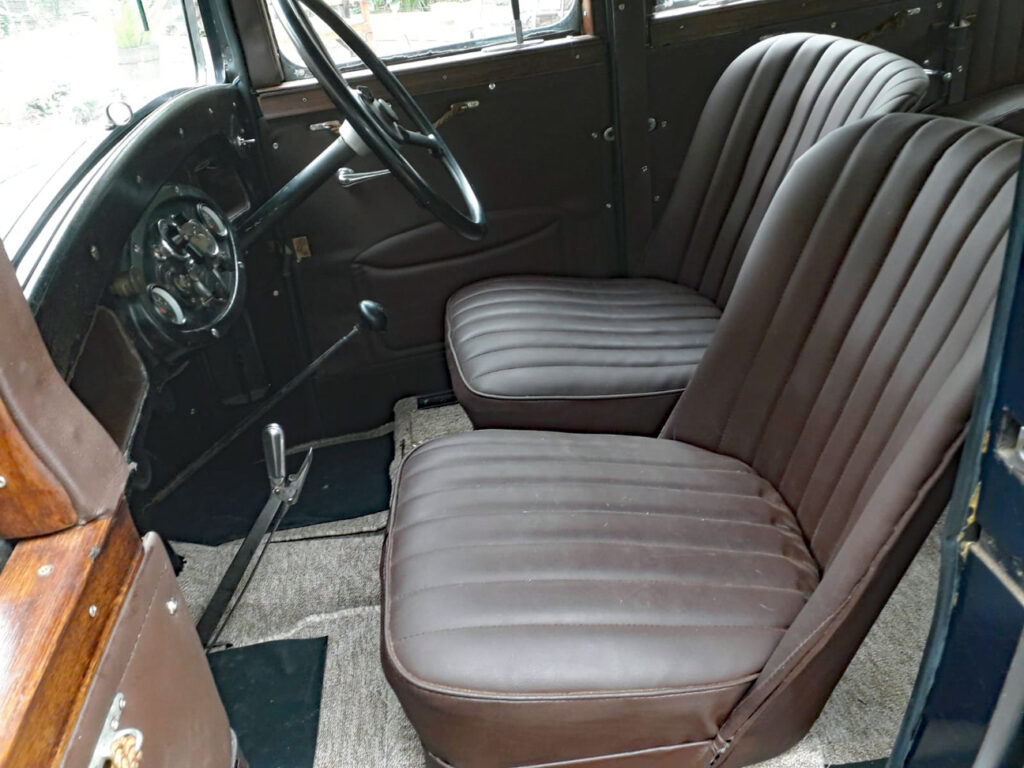
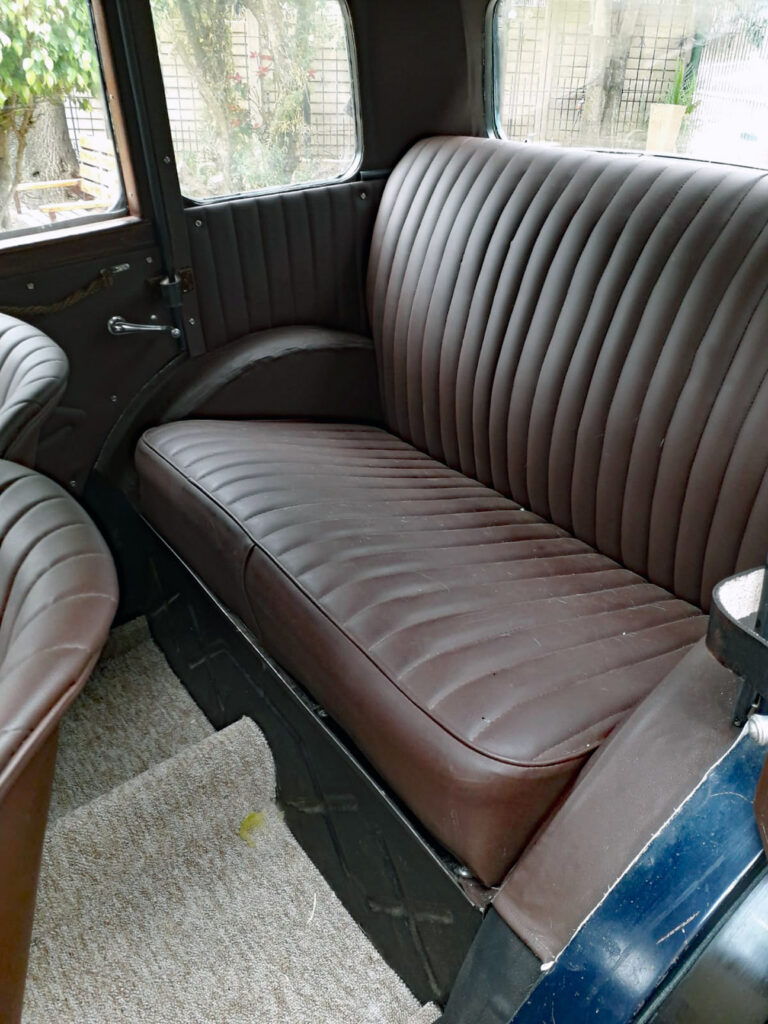
It was not until 2023 that the project was revitalised with a new hand on the wheel. This was none other than Lukas Nel who, apart from being the master restorer of most of Sandstone’s steam locomotives, was also highly skilled with old vehicles and he breathed new life into the Morris 10 by reupholstering the interior and spent three weeks hand polishing the paintwork to remove 80-plus years of grime and dirt.
We specifically did not want to respray the car so as to keep its ageing patina. The engine and gearbox were sorted out by Tobie Meyer who has assisted Sandstone with several projects, including our BSA Railcar and the Allen Trench digging machine. Like Lukas Nel, he’s a man of many talents.
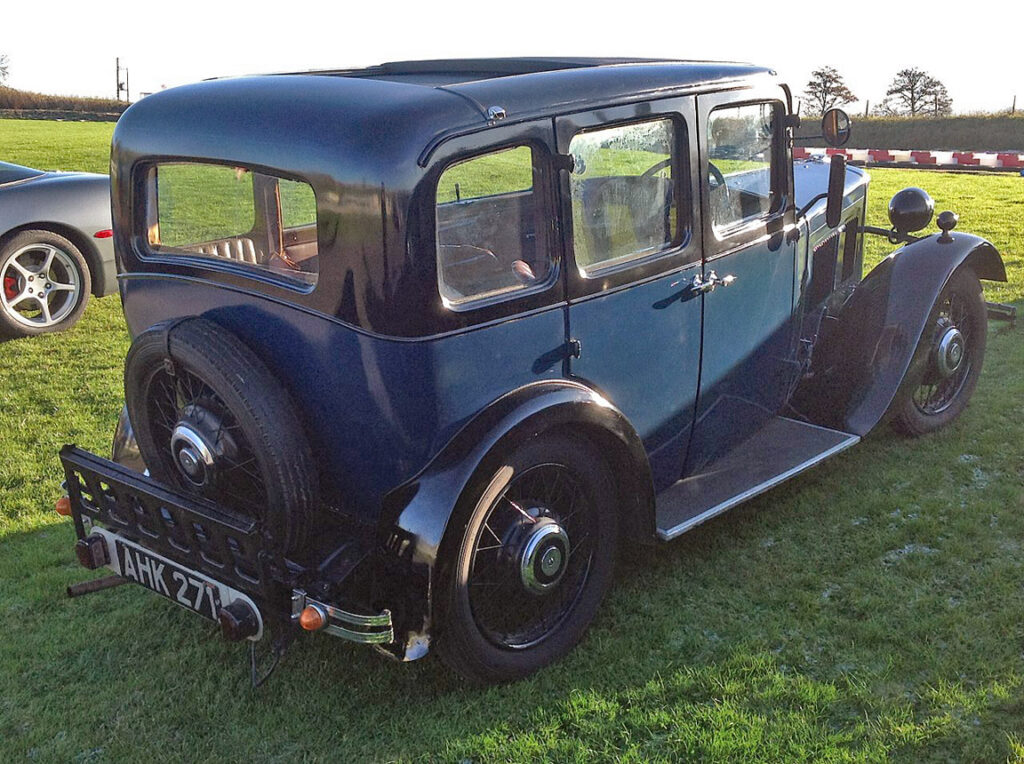
The Morris is now looking splendid and sees the odd run in Johannesburg.
Not the Sandstone car but a similar one at a show somewhere
Some numbers Engine: Morris 1292 cc, four-cylinder side-valve, two valves per cylinder, naturally aspirated Power: 24 bhp @ 3200 rpm Transmission: Four-speed manual Acceleration: 0-50mph, 33.0 secs Overall fuel consumption: 35.0 mpg Imperial Tyres: 4.50/19 crossply Fuel tank: 6.5 gallons Imperial (29.5 litres) Turning circle: 37.0 feet Kerb weight: 19.5 cwt (991 kg) Production run: 1932 to 1935 Body styles at launch were: fixed-head saloon at £169-10-0, sliding-head at £165-0-0, two-door Special Coupé for £195-0-0
William Morris established Morris Motors Ltd in Cowley in 1919 and by 1924 was the UK’s biggest car manufacturer, producing 2,000 vehicles per week.
He had diversified his business interests by founding or acquiring subsidiary companies that produced engines, bodywork and other components. Morris Commercials built trucks and taxi cabs while firms such as MG, Wolseley and Riley became part of the organisation as well. His small-to-medium vehicle ranges would, however, prove to be the most lucrative.
Morris Motors entered the small-car market in 1928; first with the Morris Minor and then the Morris 8 in 1934. Alongside these, the ten-horsepower class took a large slice of the UK market with Austin, Morris, Ford, Vauxhall and Hillman all selling similar products head-to-head.
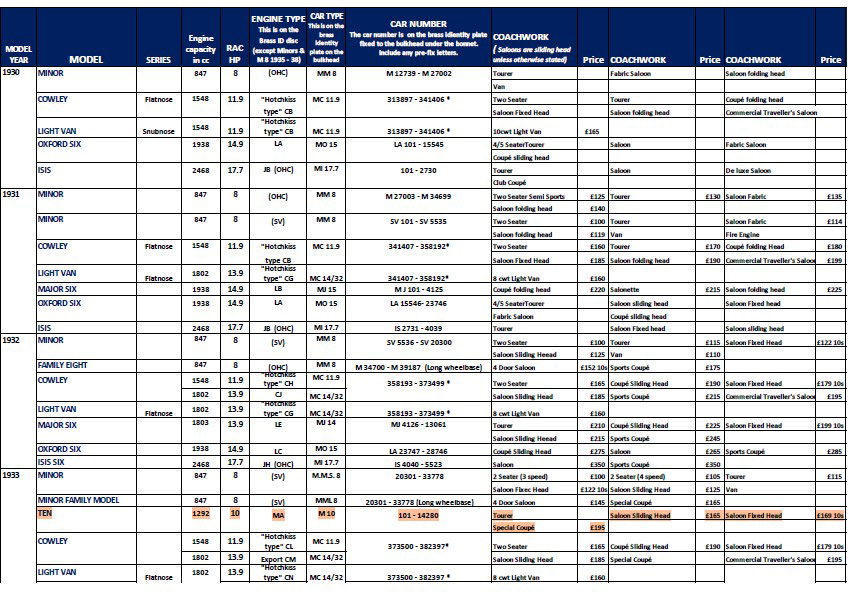
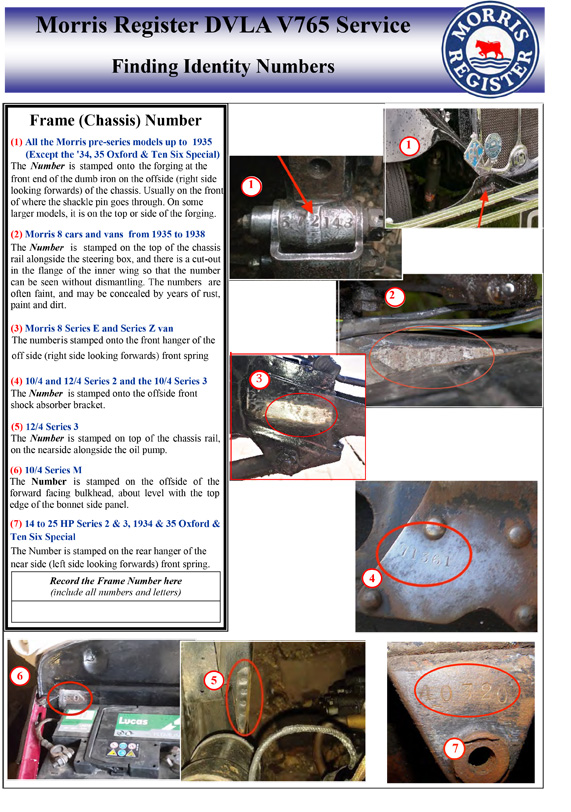
1933 spec sheet pageWhere to find numbers
These early *RAC, or licensing, horsepower ratings may originally have had something to do with actual power outputs, or even cubic capacities, but humans always find loopholes if not specifically forbidden from doing something sneaky. It wasn’t long, therefore, until manufacturers took to enlarging engine capacities, and increasing power, by the simple expedient of lengthening piston stroke. Result: a more desirable engine at the existing RAC, or taxable, horsepower rating. “Nobody said we couldn’t, did they?”
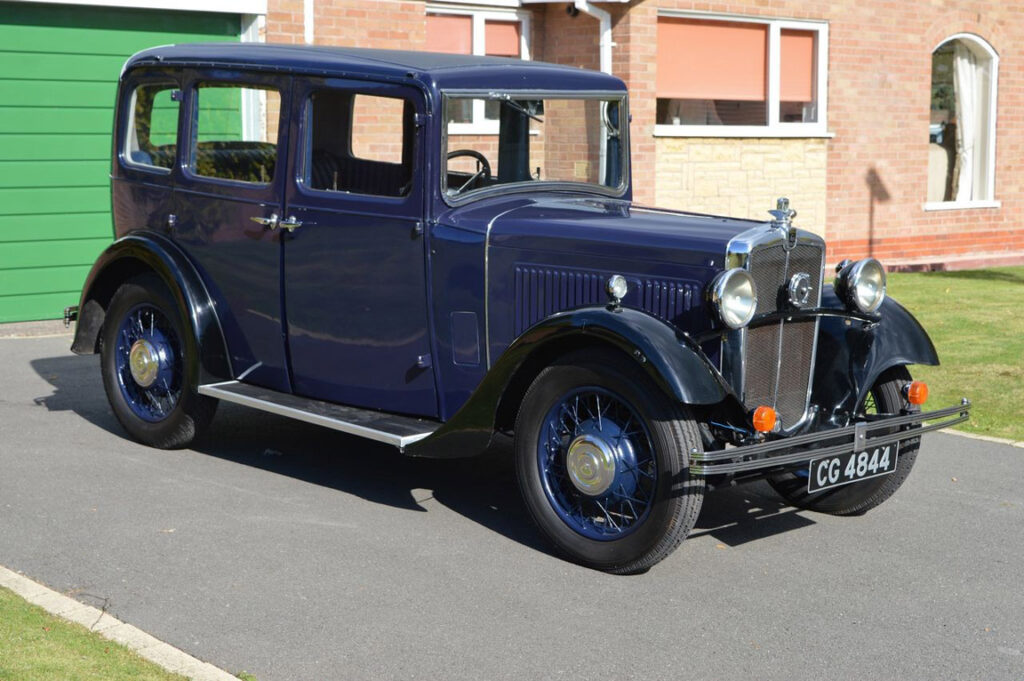
The Morris 10 was introduced in 1933 and proved to be very successful. Built on a conventional ladder chassis, it was fitted with a side valve, 1,292cc, four-cylinder engine using a single SU carburettor and producing 24 bhp. The gearbox was originally four-speed but an overdrive was fitted later. Lockheed, hydraulically operated, drum brakes were fitted.
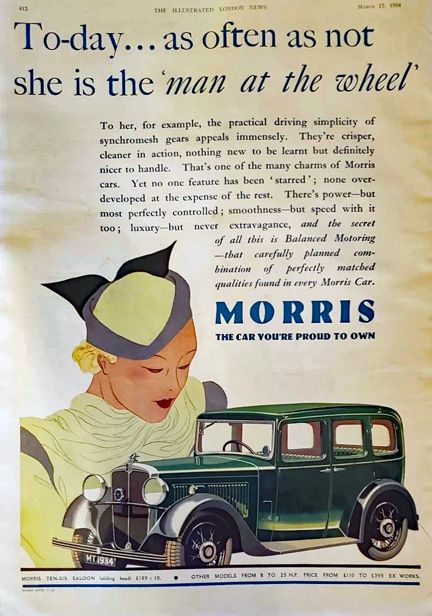
Body styles at launch were a fixed-head saloon priced at £169-10-0, a sliding-head version at £165-0-0 and a two-door Special Coupé for £195-0-0. A four-door tourer joined the range that December and was followed, in 1934, by a Traveller’s Saloon and a two-seater with dickey.
The summer of 1933 heralded the introduction of a 12 hp, six-cylinder, model labelled Morris 10/6 so, to avoid confusion, the four-cylinder car was renamed 10/4. A total of 49,238 Morris 10s and 10/4s were built before being replaced by the revised Morris 10 Series II in 1935.
Morris Ten continued through a number of variants until October 1948 when, together with Morrises Twelve and Fourteen, it was replaced by the 13.5 hp Morris Oxford MO.
Early models had a centre accelerator pedal and large sidelamps on the wings, the propeller shaft had Cardan (Rag joint) disc couplings made from leather. After 1933 the accelerator pedal was moved to the right of the cluster in line with modern convention. One source claimed that wheels became 18-inch, “Easy Clean,” at that time but your scribe hasn’t found confirming evidence of this.
The numbers Engine: Morris 1292 cc, four-cylinder side-valve, two valves per cylinder, naturally aspirated Electrical supply: Twelve-volt dynamo Ignition: Coil type Bore x Stroke, inches: 2.5 x 4.0 ( 63.5 x 102.0 mm) *RAC horsepower formula: Piston diameter in inches, squared, times number of cylinders, divided by 2.5 (Therefore 2.5 x 2.5 x 4 ÷ 2.5) = 10 horsepower Crankshaft: Three main bearings; white metal Compression Ratio: 6.5:1 Chassis: Double box-section Power: 24 bhp @ 3200 rpm, increasing to 27.5 bhp @ 3400 rpm in April 1934 Fuel: Petrol, via single SU carburettor Layout: Longitudinal front-mounted engine; rear-wheel drive Clutch: Wet, cork plate Transmission: Four-speed manual; with overdrive from 1934 Gear ratios: 3.97/2.25/1.47/1.00 Final drive ratio: 4.70:1 Maximum speed: 65.2 mph Acceleration: 0-50mph, 33.0 secs Overall fuel consumption: 35.0 mpg Steering: Bishop cam Suspension: Semi-elliptic leaf springs front and rear. Hydraulic shock absorbers Brakes: Lockheed hydraulic; 11-inch drums front and rear Wheels: 19-inch Magna type, wire spokes. See text. Tyres: 4.50/19 crossply Fuel tank: 6.5 gallons Imperial (29.5 litres) Measurements, length/wheelbase/width/height in inches: 147/96/62/64 Track, front/rear: 48 inches Turning circle: 37.0 feet Kerb weight: 19.5 cwt (991 kg) Production run: 1932 to 1935
A uniquely Rhodesian build on an American engine and chassis
The former Rhodesia, now Zimbabwe, has always been a haven for interesting, and generally old, motor vehicles. It’s perhaps the British origins of Rhodesia – that carried forward to Zimbabwe – but over the years, since independence in 1980, it has been the source of many interesting finds.
South African historic vehicle preservation trust, Sandstone, responded to an enquiry from Bulawayo, in August 2019, to have a look at some vehicles that were for sale. This was not particularly a collection as such, but rather a property full of vehicles that had been used by the owner, Martin Sanderson, over the past 50 years; some vehicles, in fact, even longer. Examples included four Rhodesian built Minis, an MG Y-type, an MG TC, a British Motor Corporation Marshall coach used for mechanic training – one of only a few built in the world – a 1927 Dodge Sedan, a 1926 Morris Cowley, a Ford Model T that had belonged to H. S. Henderson, a soldier awarded the Victoria Cross in 1896 during the Matabele uprising, and a Model T pick up; all, at various times, used by Martin’s family. The jewel that stood out was a 1931 Dodge Hunting Van built by Marzorati in Bulawayo.
Sandstone decided to purchase this vehicle and so began a three-years-plus operation before it finally arrived in South Africa in February 2023. Documents received with the vehicle, and information from Martin, provide a fairly comprehensive history of this Dodge.
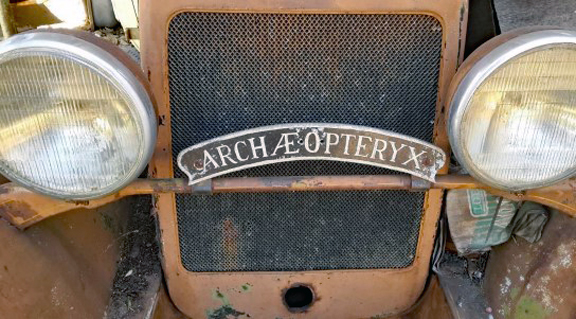
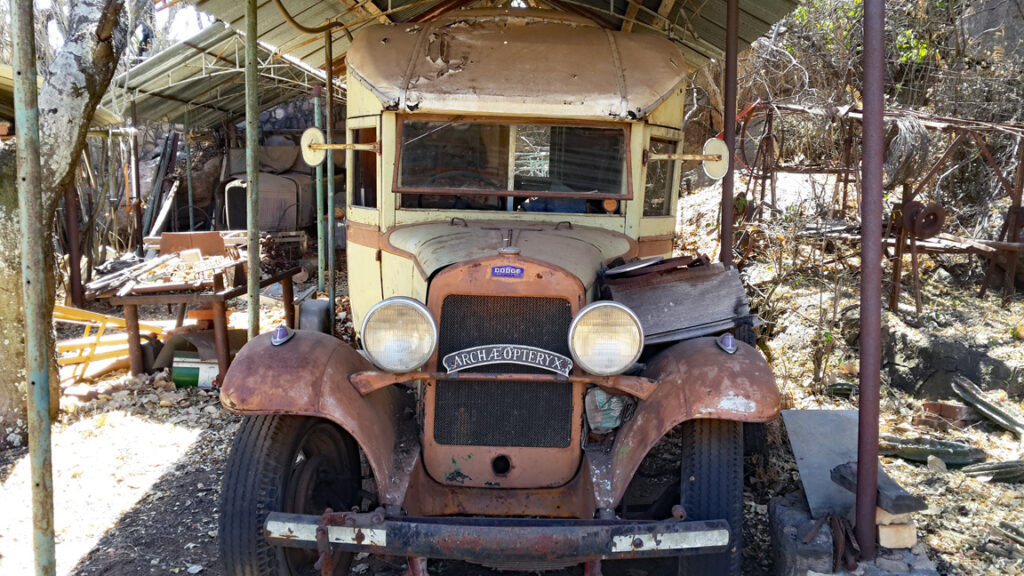
It is known as “Archaeopteryx” because one of Martin’s friends, who worked at the National Museum of Zimbabwe, suggested that the van was left over from the era of dinosaurs; hence ‘“Archaeopteryx”, a birdlike dinosaur from over 150 million years ago. Over the years, however, the van has also been called “Bundu Baby” and “The Caravandah” by friends and their children.
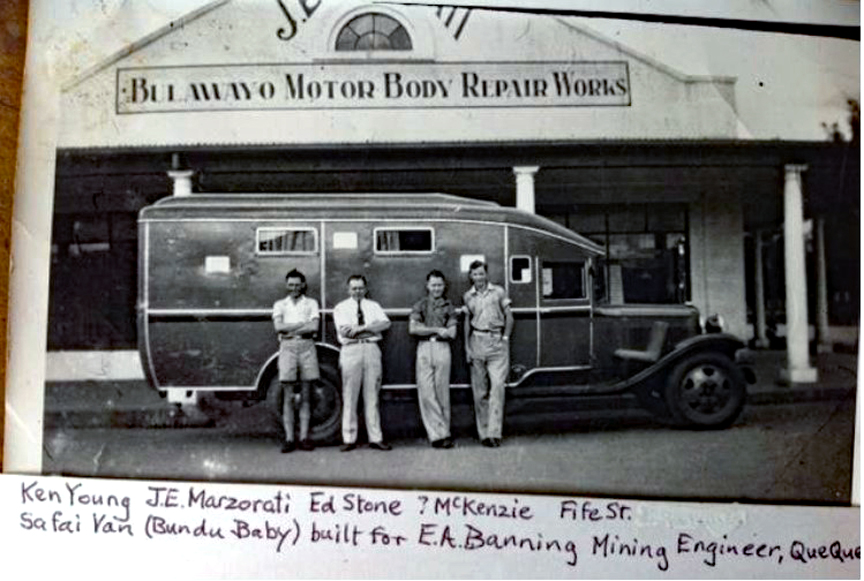
In the late 1920s E. A. Banning, a mining engineer from Que Que in Rhodesia, approached J. E. Marzorati who ran a vehicle body-building business in Fife Street, Bulawayo and commissioned his company to build a caravan-type ‘safari’ body on a Dodge Brothers chassis; a vehicle that could be used on hunting and fishing trips in the remoter parts of the country. It was christened “Bundu Baby.”
When the vehicle was close to completion Marzorati exhibited it at the Bulawayo Motor Show in the Police Drill Hall in Bulawayo. Unfortunately nobody had taken into account the height of the exit from the Marzorati workshop out into Fife Street. This meant that the wheels had to be taken off and the Van edged out on trolley-jacks. The wheels were then replaced and the triumphant team had their photos taken standing next to the Van. The vehicle was registered G3789, signifying Gwelo, now Gweru.
Mr. Marzorati left off one side of the body to enable visitors to the Show to see the interior and the superstructure. E. A. Banning sold it some years later to a friend, George Rudland.
On a brief visit to Salisbury (Harare), on one occasion, Martin Sanderson visited George Rudland at his home in Emerald Hill in the hope that he might have had some photographs of the vehicle out on one of his fishing/hunting excursions. Unfortunately he was not able to help in this respect. However, he enthusiastically said, “Young man, you are reminding me of a part of my life I’d forgotten about. You know, that Dodge never let us down. It got my wife and myself out of every hole we ever got into”.
Archaeopteryx never let its owners down
From George Rudland the van went to new owners, a farmer and his wife, who used it as a base while they were building their house on their farm. One day the farmer stopped in the middle of Bulawayo where he saw Martin parked with the Van in shopping centre parking. “My son spent the first six months of his life in this vehicle,” he told him.
This was in the early ’60s and, after the house was built, the van stood out of use on the farm until subsequently rescued by another Bulawayo resident and brought into town. Again it remained out of use. Martin Sanderson saw it in 1974, in a sad state with four flat tyres, and bought it in September 1976. In 1977 he started work on repairing the van as it had been standing in the open for a long time. Martin takes up the story:
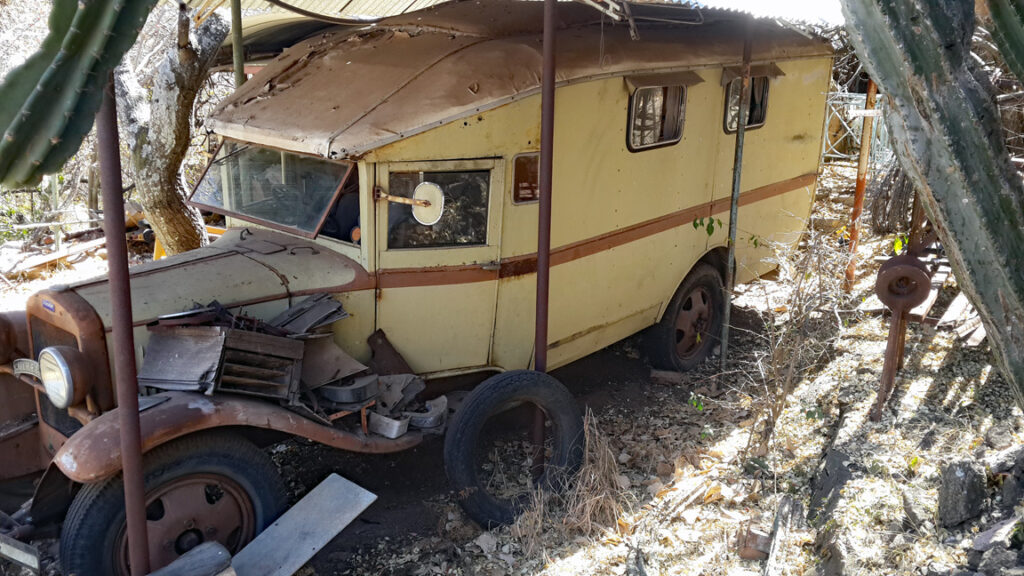
“All the tyres were flat when I came across this custom-built safari van. Several families of rats had made themselves extremely comfortable in the many hidden recesses in the interior. The mudguards were painted black. The canvas of the roof was non-existent. The sides of the living compartment were coming adrift from the very well designed and fabricated superstructure that J. Marzorati and his team had constructed in their premises at “Bulawayo Motor Body Repair Works” in Fife Street/9th Avenue in 1931. The entire body had at some time been liberally coated with silver aluminium paint.
“I stripped off the zinc sides and also the disintegrating plywood walls and replaced with marine ply. Aluminium replaced the old zinc sheeting. I then decided to put in slightly larger windows to replace the wooden-framed originals. The paint in the engine compartment was sand coloured; hence my painting of the main body the same sandy shade which reflects so well the Highveld landscape of this part of central Africa. The mudguards I painted brown. The roof I insulated with blanketing, finally covering the whole with white PVC. And so ‘Bundu Baby’, as the van was called at the time, slowly came to life again”.
Rhodesia was granted independence by the UK in 1980 to become the Republic of Zimbabwe after a fierce Civil War. Martin takes up the story again: “It was pressed into service in the early 1980s on my various forays out into the bush away from the National Museum of Rhodesia (now the Natural History Museum of Zimbabwe. NHMZ). After the demise of Southern Rhodesia I reversed the aluminium sign in front of the radiator and gave Bundu Baby a new name: “Archaeopteryx”. I felt that the flightless ancestor of modern birds may well have glided across the paleo-landscape in much the same way as I have negotiated my way up and down the by-ways of this part of our tectonic plate!”
The history of Zimbabwe is well documented as are the violent land invasions that took place in the late 90s and early 2000s and by this time, the Dodge had suffered a major engine failure. It was during the time of the land invasions, around 2002, that Martin Sanderson stopped using the vehicle and decided to try and sort out the engine.
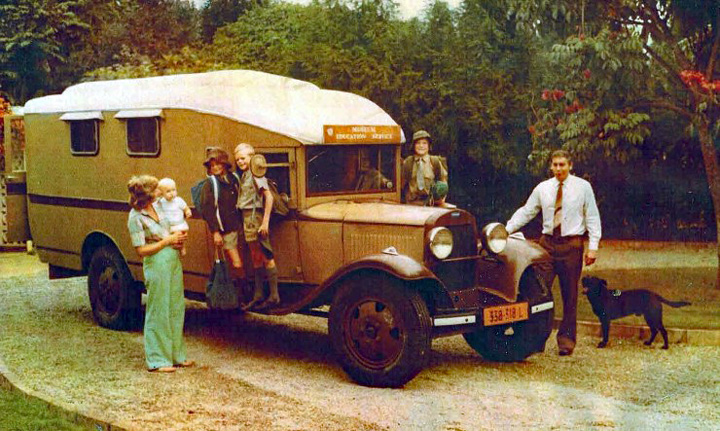
Martin Sanderson (right) ready for an educational trip with the Dodge.
He had used it extensively, up until then, for school environmental education trips into the bush. The Van had also been used on Museum field-trips; forming a “home base” for students.
It had towed a trailer containing all types of equipment to enable young intellects to, hopefully, consolidate what they may have learned from their environmental excursions.
Sadly Martin never actually used the van for hunting or fishing. As he says, “the only hunting or fishing trip I’ve been on with “Archaeopteryx” was to Johannesburg in 1982 when I was hunting and fishing for parts, and went on a mission to the Old Car Shop near the Railway Station!” With the turmoil in Zimbabwe, the intention to get the engine rebuilt wasn’t to be.
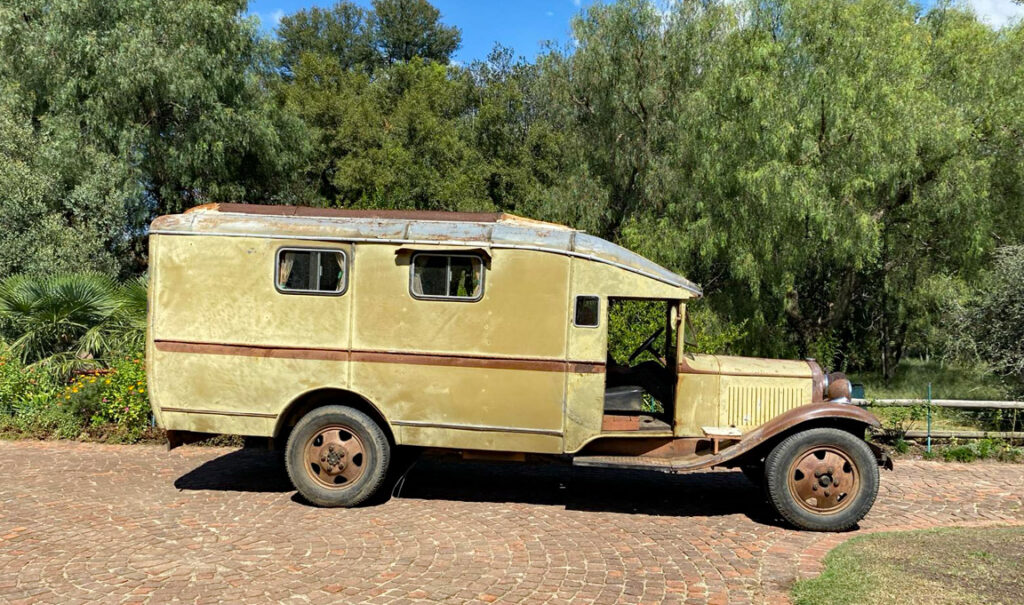
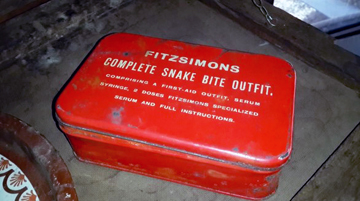
Today we would refer to the unit as a Camper Van but in the 1930s and onward, much of now-Zimbabwe was bush, so hunting and fishing excursions were commonplace. The Dodge was used extensively by various owners for trips all over Rhodesia. Tarred roads were virtually non-existent and, although the Dodge is not four-wheel drive, it travelled many many miles around the country. The vehicle is remarkably complete even to the point of having the original snake bite kit still on board!
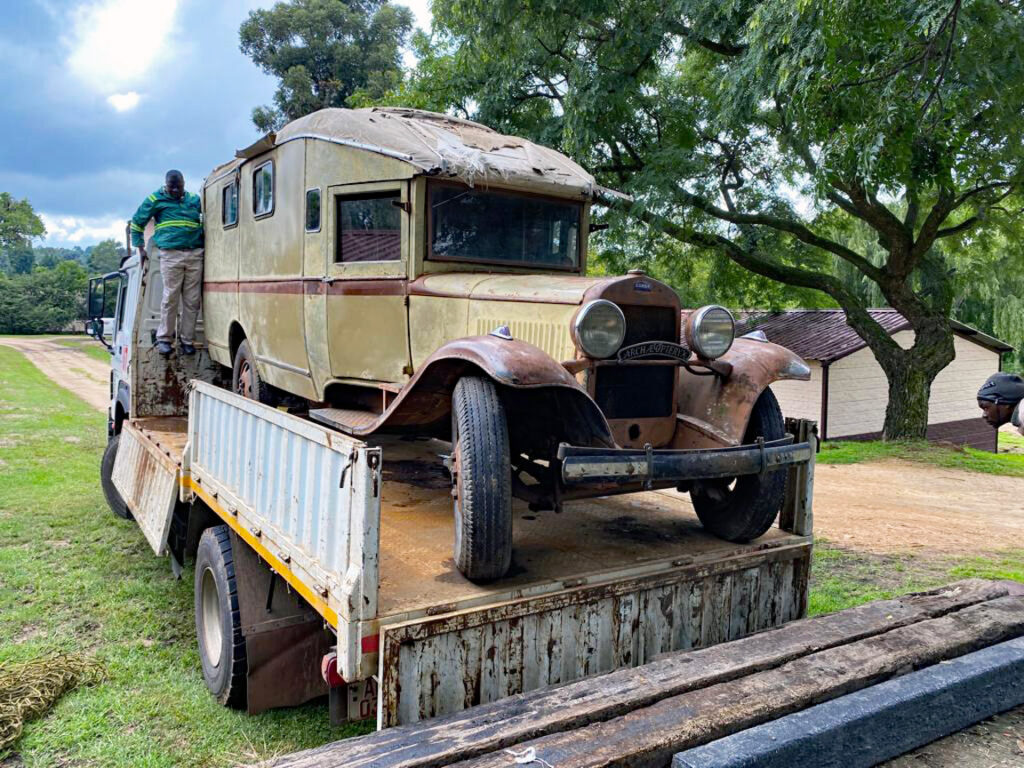
This, and the next picture, are of the Dodge as it was found in Zimbabwe prior to being transported to South Africa
Arrangements began in early 2020 to purchase the vehicle but soon the Covid pandemic hit the world and negotiations stopped as any movement of the vehicle would have been impossible. As Covid retreated negotiations for the purchase resumed in January 2022. These went smoothly, and were finalised, but for an administrative error in Zimbabwe with the licensing of the vehicle.
The vehicle was originally licensed in 1931 as G3789. These old type Rhodesian registrations were changed in 1971 to a computerised system and the Dodge was allocated a new number. In 2006 the number plate system was changed again and the Dodge received another number. This is where the obstacles began. Although the paperwork showed all the correct numbers, the system at the Zimbabwean licensing department did not! After almost 12 months of wrangling, whereby the problem was even escalated to ministerial level, the Dodge was released from the country and arrived in South Africa in February 2023.
Mr Wilfred Mole of Sandstone takes up the story in a note to Martin Sanderson: “What a superb day it was for us, Martin, when we woke up on Monday morning and found at our gate a truck, belonging to a transportation company from Harare, with the Dodge on the back. The Old Girl is safely in our workshop and we are currently evaluating the situation. The bodywork is in much better condition than we thought it was and we will have no difficulty bringing that up to a high standard.
Arriving on the back of a truck from Zimbabwe
“The engine also looks OK. Obviously the cylinder head was removed but we are going to take the engine out and completely overhaul it, so that it is back to full original spec’. Fortunately I know a guy who is familiar with this generation of engines – and is supported by an engineering shop that does superb work on machining – should that be required as well.
“We are going to leave it in its original patina; i.e. it will not be repainted. We’ll just bring it back to full useable condition while leaving it looking very much as it does now.
“I would also like to thank you for the meticulous way in which you included a workshop manual, as well as some provenance on the vehicle, which I have with me.
“Thank you for your patience and thank you for trusting this old vehicle to us. You are always welcome to come and visit us at any time, and obviously once it is going we will take it for a spin.”
After just over a year since the 1931 Dodge Hunting Van arrived at Sandstone from Bulawayo, Sandstone has been busy with various restoration items, but in particular the Dodge engine, after suitable parts were sourced from the USA. In March 2024 the Dodge took a few trial runs in Johannesburg and the engine proved to be perfect.
Not the author. Image courtesy of The Scottish Gallery
TYRES AND TRIBULATIONS
By John Carlyon – on returning from a working trip to England.
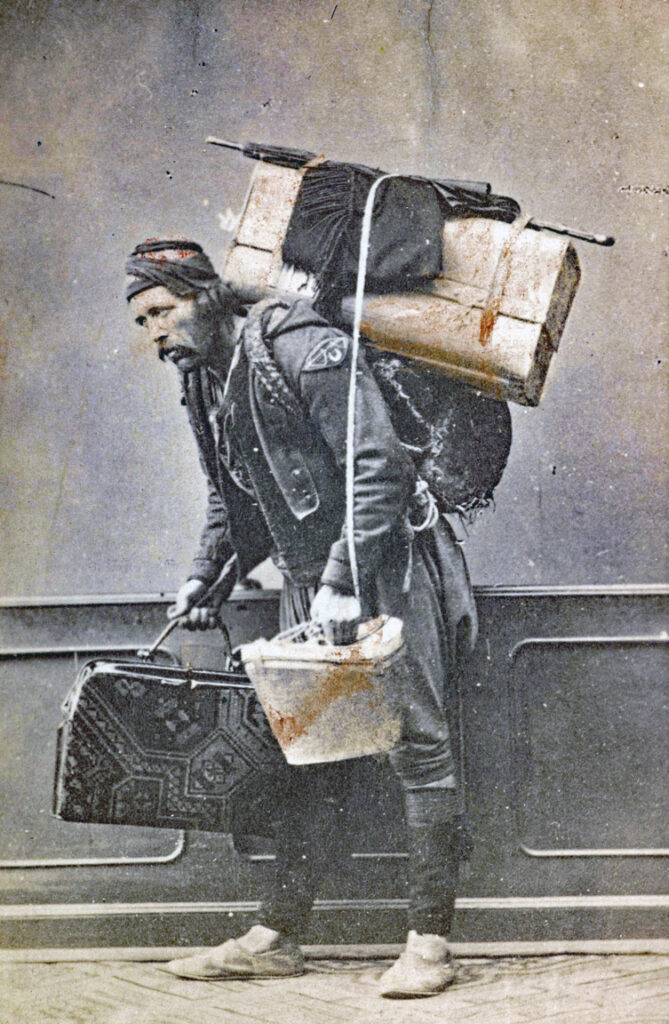
I returned, armed to the teeth, with hopefully all the necessary engine spares for our 1936 Rolls Royce 25/30, as well as two Firestone tyres for her (6.50×19″); weighing 23kg together! Funnily enough a few people suggested the old tyres-around-waist-under-a-large-poncho method of getting onto the flight… until they saw them!
Actually, getting the tyres to Heathrow and onto the flight proved to be quite an interesting exercise: After a hectic morning, finalising my veterinary cases and finishing off my packing, I was dropped off at Adisham, a small local country station. On trying to board the train I soon discovered that you can’t enter or leave a train – through a normal door – with an overweight suitcase in one hand, and a pair of oversize tyres under the other arm, while also wearing a solidly packed backpack. Something has to be left behind or first deposited inside the coach. And hope the train doesn’t take off in the meantime.
The conductor came around and sold me a ticket that included the fare for the underground all the way to Heathrow, which I thought was a good thing, as it should save valuable minutes spent buying a tube ticket in London.
I had a very tight schedule to get to the airport for my flight at 19:30. Getting to Victoria was easy enough and I arrived there still on schedule. So, all I had to do now was contend with the seething masses in peak rush-hour and, without wasting any time, get down into the underground station and onto the District Line tube. By the time I got through the dense crowds of commuters, down the stairs and on to the platform, I was sweating and puffing. London was hot and muggy. It was then that the wheels started falling off… the ticket didn’t go into the automatic gate opening mechanism! So I had to look for an official to let me through, or so I thought.
Eventually when I found someone, he politely informed me that I had to go back up to Victoria Railway Station and change my ticket for an underground one! I couldn’t believe my bad luck but set off in the direction I had come from cursing the conductor who had sold me the ticket for not telling me this. I got up to the railway station at 10 to 5 and joined the long, excruciatingly slow queue for ticket sales….
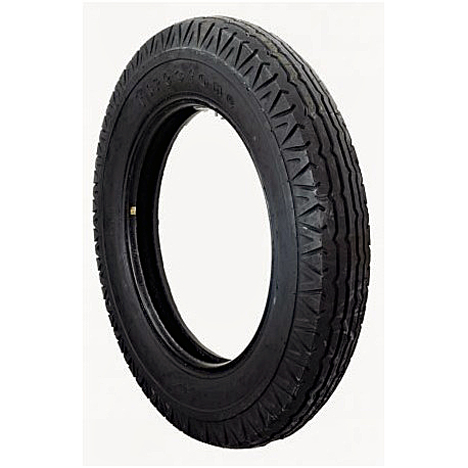
Two tyres like this
So eventually I got back to the automatic gates armed with a valid tube ticket. I even made sure it was a return (back into London) as by now I was sure I was going to miss my flight. It was going to be at least an hour on the tube to Heathrow.
I now discovered that the tyres were too tall to fit through the “baggage” slot, it could only cope with just the suitcase. So I had to sort of dash through the gates with tyres in front and backpack behind, hoping not to be cut off halfway through.
The tube up to Hammersmith, where one changes onto the Piccadilly line, was painfully slow; stopping for ages on one occasion. As there was no service to Rayner’s Lane, passengers had to use the Heathrow tube instead, so it was doubly packed. It was seven minutes in coming and I was not going to miss it for anything.
Eventually everyone was on except me but, within the wide doors where I was hoping to step in, was just a solid wall of bodies. I moved to the narrow door nearby and reckoned I could just about get in there… There were a few stifled groans as my baggage sort-of forged a path into the packed compartment, followed by me, apologising profusely. Hunched over to allow the tube doors to close behind me, I had to remain immobile for a few stations until sufficient people had disembarked to allow me to move a bit.
It was now after 6pm and Heathrow was still about eight stations away. Check- in would close an hour before the flight departed, at 7.30pm. Luckily the lines seemed to open up a bit and the driver sped up to a cracking pace, so there was just a chance I was going to make it. But I still had to have my ticket changed, check in, get the tyres to VAT reclaim, and back to check in. Finally, at Terminal One, it was a mad dash along the corridors and travelators with a trolley loaded with the 65-odd kg of luggage, up the ramps and into the lift, and then right across to the far end of the upper level. I was now sweating profusely and waited for ages while they changed the dates on my ticket.
At check in, nearby, I heard them giving a lady a very hard time about her excess baggage which it seems she had no money to pay for. This did not bode well. I needed to debulk the hand baggage as it also looked too big (you’re only allowed 7kg and I had double that), which meant putting on my fleece – to add to my discomfort. So, with some trepidation, I put my bag on the scales and explained that the tyres were going to VAT reclaim. The guy looked at them and said “they’re not very heavy are they?” with which I readily agreed…
Unfortunately he then thought better of it and said “well, put them on the scales anyway”… and as expected, he then told me I was over the weight limit. At this point I produced my letter from SAA Voyager which informed me that I was allowed 30kg extra baggage allowance – which he read with amazement, and reluctantly said “OK then”…..In fact I had already made enquiries to confirm what was on the letter and it seems that this was no longer applicable, in London at any rate! But I wasn’t letting on that I knew.
I was on the flight, tyres and all. As it was time for check-in to close, an airport official even escorted me to VAT reclaim, bypassing all the queues, and brought the tyres back to check in for me!
At SA customs there was no one around – at the precise moment I walked through – so I had no trouble there either!
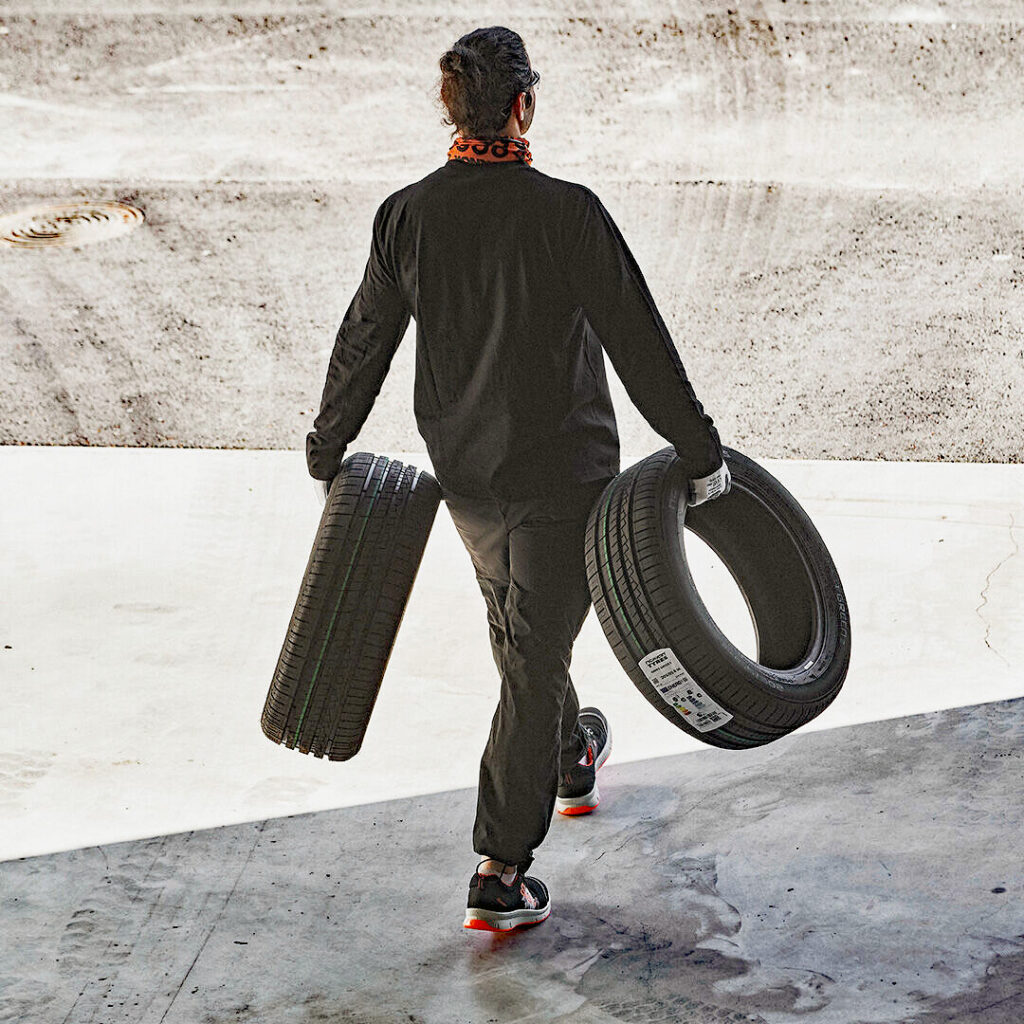
This one isn’t the author either…
After another recent trip to the UK, tyre number 3 has arrived with considerably less trouble than the first two. The lady behind the check-in counter at Heathrow exclaimed “Now I have seen it all”!
The common workshop drill press a.k.a. “The thing flinger.”
Drill press: A tall upright machine useful for suddenly snatching flat metal bar stock out of your hands so that it smacks you in the chest and flings your beer across the room, denting the freshly-painted project that you had carefully placed in the corner where nothing could get to it.
Wire wheel: Cleans paint off bolts and then throws them somewhere under the workbench with the speed of light. Also removes fingerprints and hard-earned callouses from fingers in about the time it takes you to say; “Oh, sh*t.”
Skil saw: A portable cutting tool used to make studs too short.
Pliers: Used to round off bolt heads. Sometimes used in the creation of blood-blisters.
Belt sander: An electric sanding tool commonly used to convert minor touch-ups into major refinishing jobs.
Hacksaw: One of a family of cutting tools built on the Ouija board principle… It transforms human energy into a crooked, unpredictable motion, and the more you attempt to influence its course, the more dismal your future becomes.
Vise grips: Generally used after pliers to completely round off bolt heads. If nothing else is available, they can also be used to transfer intense welding heat to the palm of your hand.
Oxyacetylene torch: Used almost exclusively for setting fire to various flammable objects in your shop. Also handy for igniting the grease inside the wheel hub out of which you want to remove a bearing race.
Table saw: A large stationary power tool commonly used to launch wooden projectiles, in order to test wall integrity.
Hydraulic floor jack: Used for lowering an automobile to the ground after you have installed your new brake shoes, trapping the jack handle firmly under the bumper.
Band saw: A large, stationary, power saw primarily used by most shops to cut good aluminum sheet into smaller pieces that more easily fit into the trash can after you cut on the inside of the line instead of the outside edge.
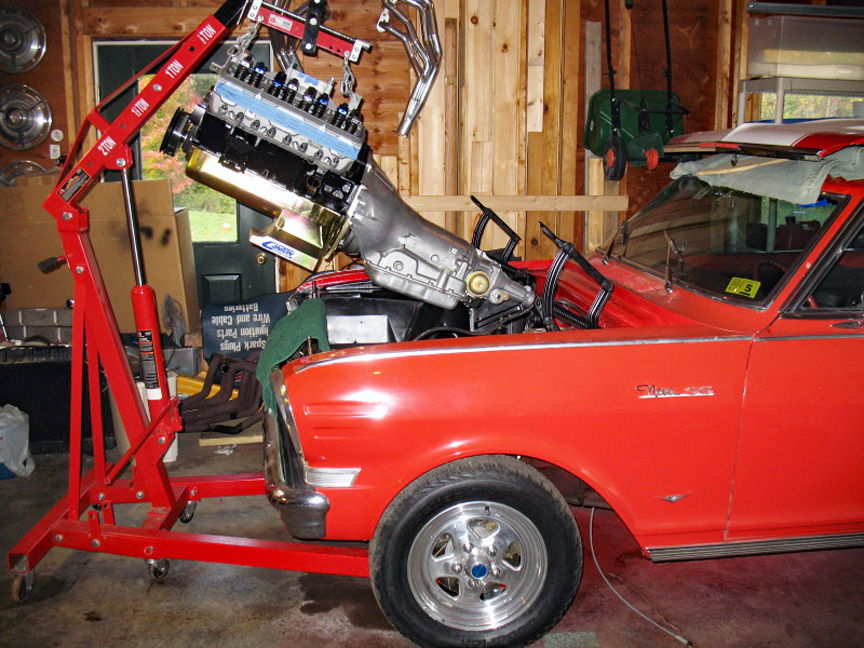
Two-ton engine hoist: A tool for testing the maximum tensile strength of everything you forgot to disconnect.
Phillips screwdriver: Normally used to stab the vacuum seals under lids, or for opening old-style paper-and-tin oil cans and splashing oil on your shirt; but can also be used, as the name implies, to strip out Phillips screw heads.
Straight screwdriver: A tool for opening paint cans. Sometimes used to convert common slotted screws into non-removable screws while butchering your palms.
Pry bar: A tool used to crumple the metal surrounding that clip or bracket you needed to remove in order to replace a five-Rand part.
Hose cutter: A tool used to make hoses too short.
Hammer: Originally employed as a weapon of war, the hammer is nowadays used as a kind of divining rod to locate really expensive parts adjacent to objects we are trying to strike.
Utility knife: Used to open and slice through the contents of cardboard cartons delivered to your front door; works particularly well on contents such as seats, vinyl records, liquids in plastic bottles, collector magazines, refund cheques, and rubber or plastic parts. Especially useful for slicing work clothes, but only while in use.
Son of a b*tch tool:Any handy tool that you grab and throw across the garage while yelling ‘Son of a b*tch’ at the top of your lungs. It is also, most often, the next tool you will need.
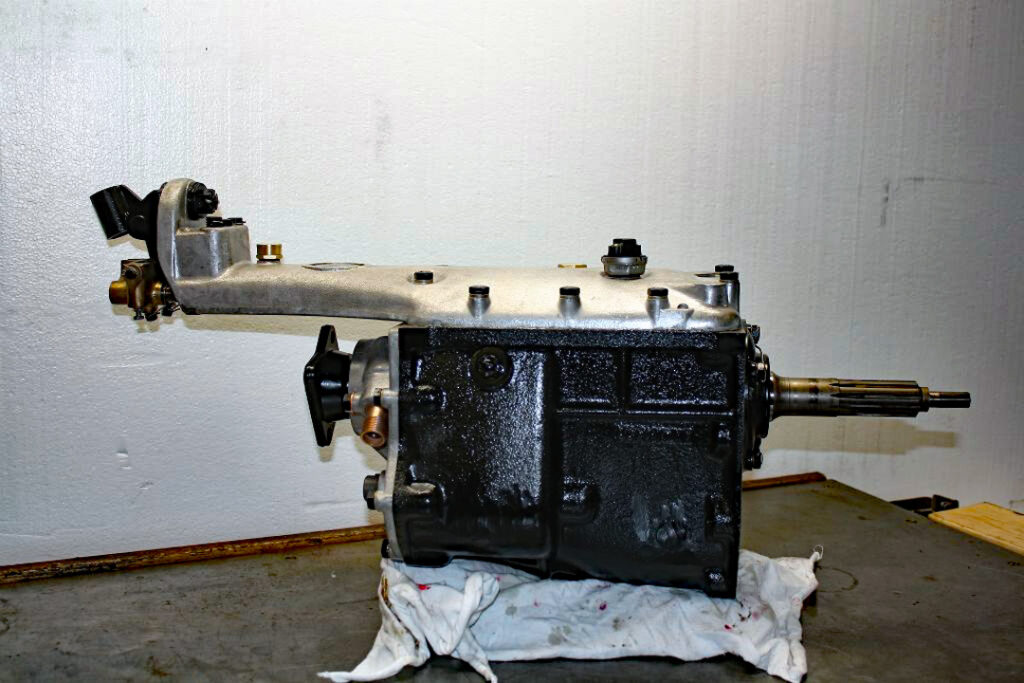
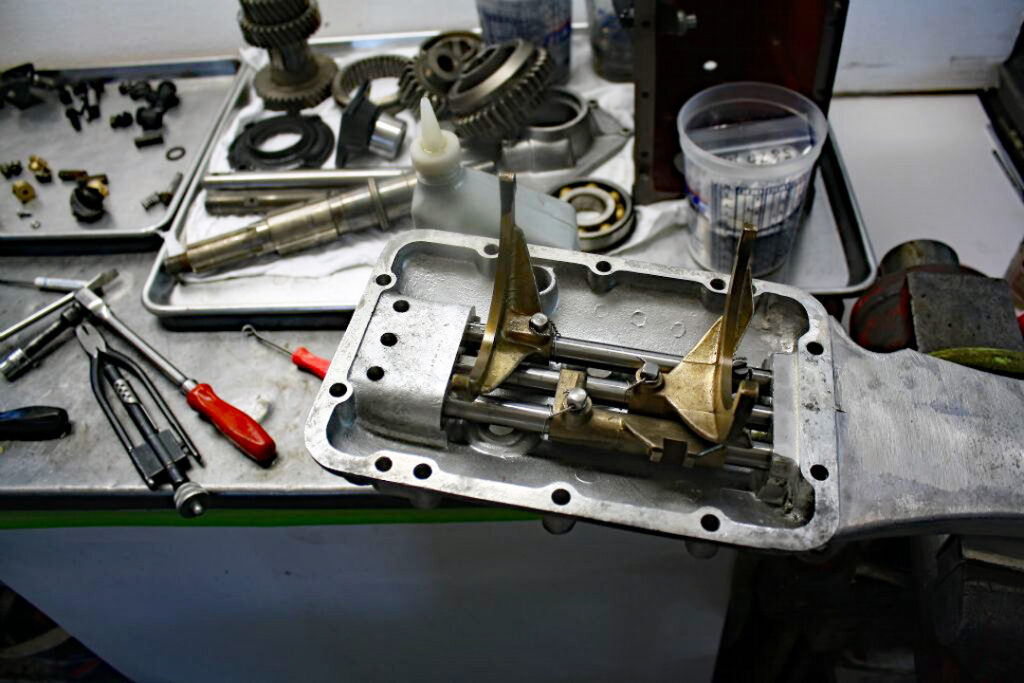
INTRODUCTION: The Moss gearbox was fitted to essentially all manual Jaguars up to the mid-1960s, after which Jaguar’s all-synchromesh unit was fitted. The Moss box came in for much criticism over the years. Much of it was justified. The main problems were: no synchromesh on first, very noisy in first and reverse, very low first gear, poor synchromesh on second, extremely long travel from first to second, and an ability to leak oil from just about everywhere.
It did, however, have some good points: It was an extremely strong unit and very seldom did internal parts fail. It was extremely quiet in the top three gears and the low first could be very useful for awkward manoeuvring, towing and steep pull-offs. It also used SAE 30 engine oil, so that meant one less lubricant to buy.
Nowadays it is fashionable to throw out the Moss Box and put in either an all-synchro Jaguar unit, a Getrag box, or even a Cressida box. I will say upfront that I disagree with this approach. A good Moss box is not that bad if driven properly. It has a certain character which goes with the car. In any case, with the engine in good condition, you are soon in fourth gear and you just stay there, occasionally flipping in and out of overdrive for overtaking. It is also sacrilege to destroy a matching number Jaguar by putting in another gearbox. Why not just buy a Corolla? (I am ignoring you -ed)
The tossing of these gearboxes is also owing to restoration books’ just about never recommending overhauling them. They say just clean and paint the box and put it back. The rebuilt car then has a terrible gearbox and the owner hates it…
Admittedly, the Moss box is fiendishly difficult to overhaul properly due to its complex assembly sequence. It can, however, be done. Gearbox shops seldom, if ever, do the job properly as they have no specs, no manual and don’t know where to get the spares from.
The purpose of this article is to give you sufficient knowledge to overhaul a Moss box properly, so that it is even better than when it was new. You must have a copy of the factory workshop manual and follow it to the letter when stripping and assembling. There are, however, some errors and omissions in the manual and I shall cover them in this article.
PARTS REQUIRED: The good news is that most parts required are available from any good bearing shop. Here is the list, with modern “bearing shop” part numbers and some Jaguar numbers. (Includes overdrive parts) 1) Factory workshop manual 2) Gasket set: cut your own from expensive 0,23 mm sheet or ENT101 – from SNG Barratt or similar supplier. 3) Spigot shaft bearing: 6308 NR 4) Mainshaft rear bearing: MJ 13/8 (May be different if no overdrive fitted.) 5) Circlip for securing item 4 above. 6) Mainshaft needle rollers: 82 off of NRA3.5×29.8 7) Layshaft needle rollers: 58 off of NRA3x23.8 8) Spigot-mainshaft caged needle roller: C1843 from any Jaguar spares place. 9) Spigot shaft shouldered oil seal: C18739 from any Jaguar spares place. (Do not use an unshouldered seal!) 10) Gear lever rubber grommets: two off of C1915 from any Jaguar spares place. 11) Synchro balls: 12 off of RB6.35 12) Synchro springs: 12 off of C900 from any Jaguar spares place. 13) Synchro spring shims: approx. 24 to 36 off of M3 flat washers. 14) Selector shaft balls: three off of RB6.35 15) Synchronising sleeve interlock balls: three off of RB6.35 16) Layshaft O-ring: 24 x 4 mm 17) Reverse shaft O-ring: R3062 18) Gear selector O-ring: R3050 19) Reverse/OD switch O-rings: two off of 4mm x 2mm 20) Speedo drive O-ring: R2081 (May be different if no overdrive fitted.) 21) Speedo drive oil seal: 0,375”x 0,75”x 0,25” double-lip seal 22) Overdrive rear output bearing: 6206 23) Overdrive inner output bearing: RLS10 24) Overdrive thrust ring bearing: KLNJ50 (50x90x11mm) 25) Circlip 90mm internal for item 23 above. 26) Circlip 47mm external for item 23 above. 27) Overdrive rear oil seal: 1,69”x2,5”x0,5” double lip seal 28) Overdrive control valve ball: RB7.938 29) Overdrive non-return valve ball: RB6.35 30) Overdrive accumulator sleeve O-ring: R4150 31) Overdrive main piston O-rings: two off of R4112 32) Overdrive actuating shaft O-rings: two off of R3031 33) Welch plugs small: two off of 7/16” diameter 34) Welch plugs large: six off of 5/8” diameter 35) Flat washers: about 40 x M8 plated (covers g/box and O/D) 36) Spring washers: about 40 x M8 plated (covers g/box and O/D) 37) Various split pins 38) Expensive grey Loctite silicone sealant. 39) Pratley liquid steel.
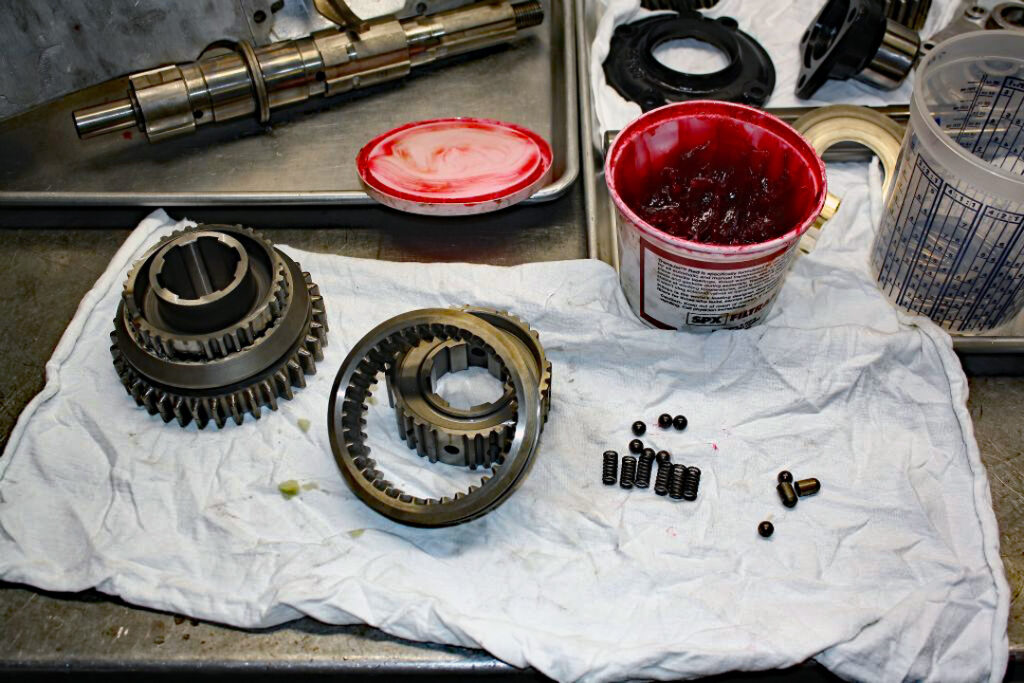
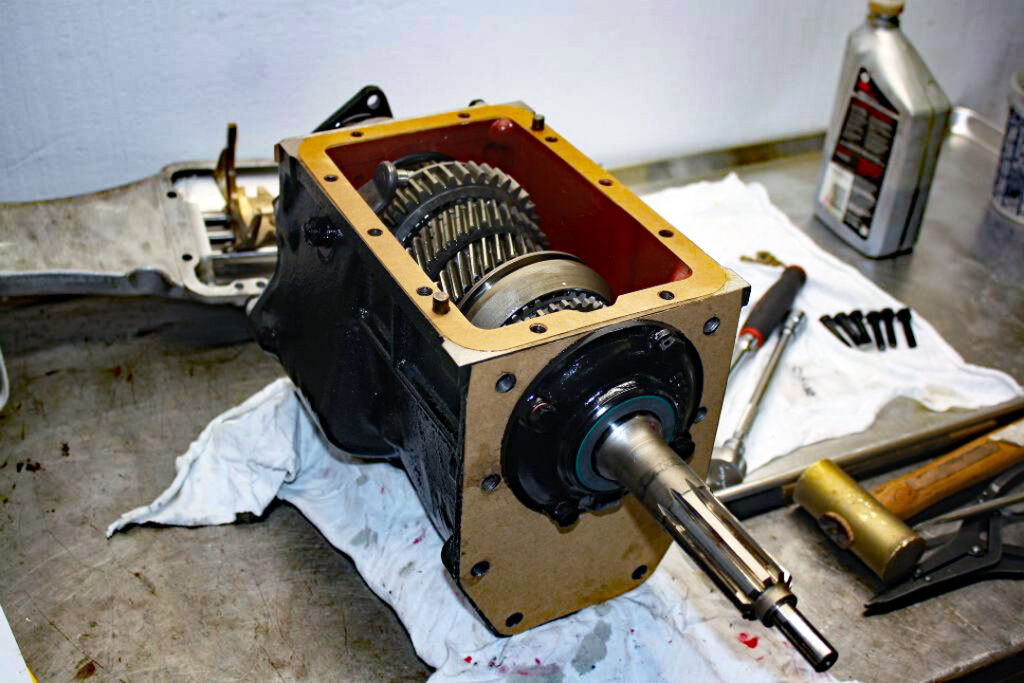
Gears. And some of the pieces that can fall out
SPECIAL TOOLS AND NOTES: The only special tools you need are a dummy shaft and a helper shaft. WARNING: The dimensions given in the manual for the dummy shaft are incorrect! You need one rod 24,8 mm in diameter, and 204,5 mm long, and a small helper shaft also 24,8 mm in diameter and about 50 mm long. These are easily made from a piece of 25 mm pipe or rod. Without these two items you stand a chance of losing layshaft needles – and spacers falling out – when you refit the layshaft.
NOTE: All the bolts and nuts on the gearbox, bar the one securing the spigot rod locking plate, are BSF. These are just about impossible to get in SA. So, don’t lose any! The overdrive uses UNF threads, which are no problem. A proper spanner is required for the nuts and bolts as 13 mm is too small and 14 mm is too big. Obtain a spanner marked 5/16 BS and/or 1/4 W which is 13,5mm across flats. DO NOT MIX UP THE O/D AND G/BOX NUTS!
SUPPLEMENTARY NOTES TO WORKSHOP MANUAL:
1. LAYSHAFT
If the end float exceeds 0,006” turn up a thicker bronze (not brass) spacer of the smaller of the two spacers, such that the end float is 0,002”.
The solid steel rod on which the layshaft needles run may be worn on one side only. If not too bad, simply rotate it through 180 degrees which will present a new thrust surface for the needles. This requires cutting a keyway for the locking plate on the other side and drilling new oil holes in same. Much easier than it sounds. If badly worn, get a new one.
The first gear teeth may be chipped. It is vital to carefully pencil-grind them back to a pointy shape again. This reduces stress and prevents the box from refusing to go into first; sometimes even at standstill.
The layshaft must be very carefully assembled, using LM grease only, onto the longer dummy shaft, complete with needle rollers and all spacers, and then carefully lowered into the bottom of the casing with dummy shaft in.
2. REVERSE GEAR Attend to chipped teeth as above.
3. OPTIMISING SYNCHROMESH OPERATION This is the crucial bit that almost everyone ignores.
Let’s start with first/second gear synchro unit: Remove the unit from the mainshaft. Note that a plunger and ball will fall inwards from the unit. Measure the length of this plunger with a micrometer (not a vernier!) and write the figure down. This is vital. Now put the unit into a transparent plastic bag and push the outer ring off the hub. Six balls and six springs will fly everywhere!
Dress any chipped first gear teeth as per the layshaft above.
Then, while working inside the plastic bag at all times: Put two M3 flat washers into each hole, followed by the springs. Stick the balls in place with LM grease. Clamp tight with a large hose clamp and then, using a vice, press the outer ring onto the hub; compressing the six balls into the unit. If it will not go on, remove one M3 washer from each hole and start again.
Slide the outer ring so that the six balls click into the neutral detent. Now get your bathroom scales and press down on the outer hub in the direction of second gear. Take the reading off the scale at which the balls jump out of the neutral detent. The FIGURE MUST BE AT LEAST WHAT THE MANUAL SAYS OR YOU WILL HAVE TERRIBLE SECOND GEAR SYNCHROMESH OPERATION. If too little, you need more spacers under the springs but don’t let them get coil bound. This can all take ages, but I cannot over-emphasise the importance thereof.
Now put the aforementioned ball and plunger back in the unit and place back on main shaft. Hold the mainshaft with the tail vertically upwards and slide the outer ring into the first gear position. The second gear synchro cones should not rub in the slightest. If they do, a longer plunger is required. This can be done with a dab of low-hydrogen weld and then machining back in a lathe. Increase the length by not more than 0,005”. Again, I cannot over emphasise the importance of this. The plunger must also not be too long, or drag will result when changing from first to second, especially when hot.
4. Third/fourth gear synchro
Much more can go wrong here: Remove the unit very carefully, as before, from the mainshaft but this time note that there are two sets of balls and plungers that fall inwards from the unit. As before, measure and record them accurately and identify which goes into which hole. MIX THEM UP AT YOUR PERIL.
Fit six new springs and 12 x M3 washers as before, ENSURING that it passes the bathroom scale test. Try it in both directions. Again, I cannot overemphasise the importance of this.
Now refit the two pairs of balls and plungers and place the unit back on the mainshaft. Hold the mainshaft with the tail vertically downwards. Engage third gear. The free-float of the unit should be 2,4 mm and there should be no drag. (Drag is common on third even from new….) Fiddle the length of the plunger until these two conditions are met. (Third gear plunger is the one furthest from the front nose of the mainshaft.)
Now engage fourth gear. The free-float should now be 4,8 mm and, again, no drag and no third gear synchro rubbing. Correct as required. (Fourth gear plunger is the one closest to the front nose of the mainshaft)
Failure to carry out these interlock plunger corrections will result in possible sticky gear change, sloppy gear change, poor synchro operation and/or rapid synchro wear. YOU HAVE BEEN WARNED.
5. SELECTORS AND TOP COVER Nothing is covered in the manual here…
Reverse gear detent: Nothing spoils a Moss box more than it slopping over into reverse instead of first all the time. Rectifying this, and it has to be done, is very difficult. The detent spring brass assembly has to be removed from the selector shaft; which is much easier said than done. Once it is out, then beef up the springs as required until it requires a nice smack to get the gear lever across to the reverse gate. Keep sane!
Ensure you change the O-ring on the outer selector shaft and epoxy seal the eight Welch plugs.
Open up the O/D and reverse switches carefully, clean out and fit new O-rings in order to keep oil off the electrical contacts. Clean the electrical contacts with a sharp blade, or a fine-glass beadblasting. The correct fibre washer MUST be fitted under these switches, otherwise they will either make the selector shafts bind, or the switch will not be sufficiently pushed up to make proper electrical contact.
The first /second selector shaft will in all likelihood have a steel washer crudely formed around it, at the rear, to prevent first gear from engaging too far. It is not shown in the parts manual, or in any exploded views. DO NOT REMOVE IT thinking that a monkey had fitted it. The selector detent seems to be slightly in the wrong place (factory fault) and full engagement of first gear can cause the six, second gear, synchro balls to become exposed and cause the car to jam in first gear. NB: The factory fitted this horrible washer as a quick fix… YOU HAVE BEEN WARNED.
On the external selector bits, ensure that everyting is well lubricated. The big Thackeray washer should be at the front of the aluminium pillar. The small Thackeray washer should be at the left of the gear lever. Use common sense as to where the fibre washers should be. Failure to do so results in the gear lever being in a ridiculous position in neutral. Always fit new gear lever rubber grommets.
ASSEMBLY This can be fiendish. Follow the manual, but do the following as well:
Ignore the lifting of layshaft with screwdrivers. Once the mainshaft and spigot shafts are in, then lift the layshaft into mesh with two pieces of thin wire looped around each end of the layshaft and then, with your 50 mm-long dummy shaft, push the longer (204,5 mm) dummy shaft backwards until it goes about 10 mm into the casing. Leave both dummy shafts in. All is now safe and no needles and spacers can fall out. Ensure that locking pin of large front steel spacer engages with slot in casing.
Fit layshaft rod and reverse rod to back cover using a smear of grey sealer as well as two new O-rings. Fit the locking plate and UNF bolt using grey sealer on threads of same. If you have turned the layshaft rod through 180 degrees ensure that the unworn face points upwards.
Push above assembly into gearbox, simultaneously pushing out the two dummy shafts. Bolt up the back cover using a new gasket, flat washers and spring washers. Use grey silicone sealer sparingly. All surfaces should have previously been degreased with thinners.
The mainshaft rear ball bearing, shims, spacer and circlip can be horribly difficult to get back on. Do not hammer, if stiff, as you will damage the bearing. Rather press it in with a hydraulic press. Very awkward!
The top cover must have two dowel pins.
Ensure bell housing bolts are very tight, locked and wired.
Ensure the thrust bearing fork has both circlips to hold the thrust bearing. If the solid rod securing the fork to the bell housing is worn on one side, then turn it through 180 degrees so that the unworn parts thrust against the bronze bushes. Or build up with welding and machine down. Or make a new rod.
Epoxy a magnet into the drain plug.
After a few days, put some oil in the box and, with an electric drill on the spigot shaft, run it and change all the gears. Do this before fitting the overdrive.
CONCLUSION Refitting to the overdrive, and overhaul of same, is adequately covered in the factory repair manual.
If you follow the workshop manual to the letter, except where otherwise stated in this article, and follow this article to the letter, you will end up with a Moss box that is actually quite pleasant to use. That is, of course, assuming it was not totally wrecked in the first place due to lack of oil, abuse etc.
Use only SAE 30 or SAE 40 engine oil. Despite what oil companies may say about modern gear oils, do not use them. The numerous bronze parts, and synchromesh operation, are adversely affected by the use of gear oils.
Finally, be wary of what is written on the Internet, various classic car magazines, and restoration books. A lot of it is written by armchair experts – many of whom can’t even spell Mark 2 – and much of it is a load of twaddle. For example, the book on rebuilding the XK engine contains, on average, about one error per page.
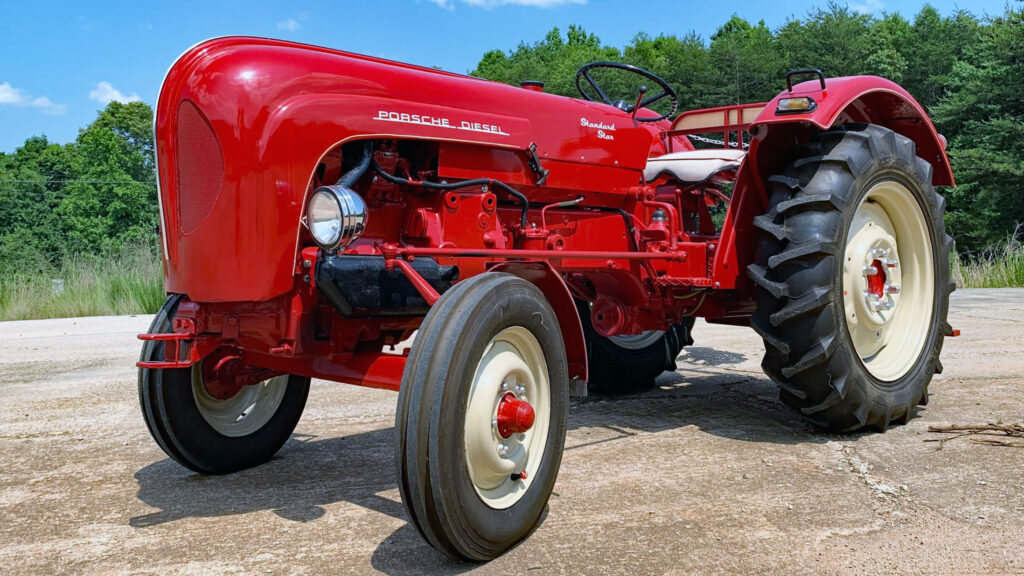
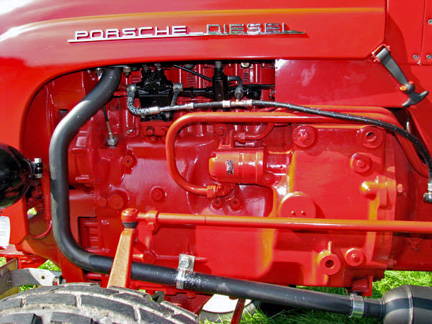
Before its sleek sports cars took to Autobahnen and dazzled enthusiasts worldwide, the Porsche legacy was rooted in something quite different; farm tractors.
It started in the 1930s: After making a name for himself, as creator of the iconic Volkswagen Beetle, Ferdinand Porsche turned his thoughts to new projects. Europe was in the grip of economic turmoil and the post-World War I landscape saw farmers in urgent need of reliable machinery. Enter the Porsche tractor. He completed his first three prototypes, with petrol engines and a hydraulic coupling between engine and transmission, in 1934.
He then established Dr. Ing. h.c. F. Porsche GmbH; a company focussed on producing not just cars, but also agricultural vehicles, in 1937. His first commercial tractors rolled off an assembly line in 1950. Sporting the aerodynamic design that would become a Porsche hallmark, they boasted levels of performance and efficiency that were ahead of their time. It wasn’t just any old tractor; it was a transformed workhorse that made farming more accessible and effective.
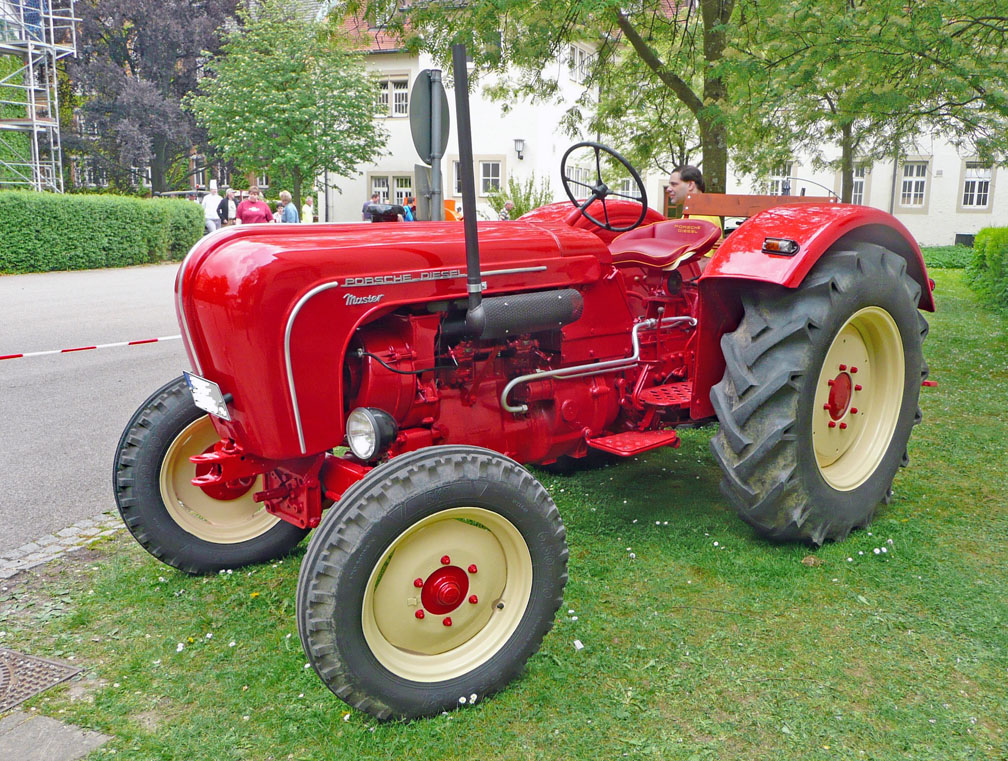
Four-cylinder Porsche Master
They were not only functional, but stylish; embodying the same design philosophy that defined Porsche automobiles. Farmers in Germany and beyond quickly took notice with models like Porsche Junior and Porsche Master becoming sought-after equipment for those looking to revolutionise their farms. His tractors offered reliability and power, allowing them to work the land more productively.
The history of Porsche tractors isn’t just about machinery, however, it’s about a shift in perception. While the world ultimately recognised Porsche as a leader in high-performance sports cars, the tractor line laid the groundwork for innovation and quality. Agricultural machinery showcased the company’s engineering brilliance long before it shifted gears toward high-performance autobahn- and track machinery.
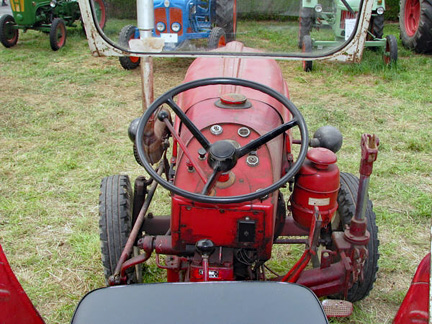
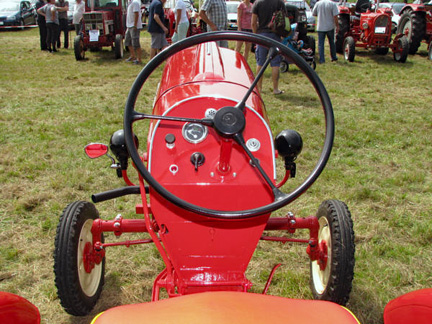
Two-cylinder Porsche Standard
But Porsche could not build any itself: Post-WW ll regulations stipulated that, because Porsche had not been established as a tractor maker before hostilities commenced, it could not do so post-1945. The job had to be licensed out to established manufacturers. The job went first to Allgeier, in 1947, and later to Mannesmann. See below.
Porsche-Diesel Just over eight years later, Porsche-Diesel GmbH took over the Allgaier production plants in Friedrichshafen on 01.01.1956. This new company was a subsidiary of Mannesmann AG, in which Porsche controlled development and design. Since Allgaier had worked closely with Porsche in the years before the sale, and built tractors “Allgaier System Porsche”, production continued seamlessly. In the various model designations, “A” for Allgaier gradually gave way to “P” for Porsche but, in practice, it took almost a year for this to happen.
The Porsche tractor range comprised 47 different versions over the years. They ranged from single-cylinder Juniors to four-cylinder Masters, with two- and three-cylinder models – as well as narrow-gauge and plantation tractors – in the mix as well.
Here are some typical specs from the four model ranges:
Model: Porsche-Diesel 419 ‘Master’ Manufacturer Porsche-Diesel Motorenbau GmbH Production 1960–1963 Length 3380 mm Width 1826 mm Height 1637 mm Weight 2100 kg Propulsion Diesel engine Engine model Porsche F 419 (Diesel, 3500 cm³) Flywheel power 50 PS (37 kW) Speed 19.4 km/h
Engine: Type designation: Porsche F 419 Type: Inline four-cylinder diesel Fuel system: Swirl-chamber injection Fuel type: ≥44 CN Bore × stroke: 98 × 116 mm Displacement: 3500 cm3 Rated power (DIN 70020): 50 PS (37 kW) at 2100 min
Model: ‘Super’ Export 339 Years of manufacture: 1962 – 1963 Quantity built, approx: 3400 Max. speed: 19,2 km/h Kerb mass: 1585 kg GVM: 2500 kg Axle load, f / r kg: 1050 / 1600 L / W / H mm: 3510 / 1530 / 1450 Wheelbase mm: 1965 Front track mm: 1248, opt. 1148 – 1648 Rear track mm: 1250 or 1500, opt. 1225 – 1725 Front tyre Size: 5.50-16 / 6.00-16 Rear tyre size: 10-28 / 11-28 / 9-32 Service brake: Drums at the back Steering brake: Yes
Engine Manufacturer: Porsche-Diesel Motorenbau GmbH Type: F329a (F339a) Fuel: Diesel Cooling: Air Cylinders: 3 Displacement: 2625 cc Bore/stroke mm: 98 / 116 Power at rpm: 30 hp at 2300 rpm Gearbox and drive: Deutz T25, manual Gears f/r: 8/2 Ranges: 2 Output axle: Behind Differential lock: Yes
Model: Porsche-Diesel 218 ‘Standard’ Manufacturer Porsche-Diesel Motorenbau GmbH Production 1957–1963 Approx. quantity: 3400 Engine: Porsche F218, two-cylinder, air cooled, four-stroke diesel with swirl-chamber injection, OHV Capacity: 1644 cc Bore × Stroke: 95 × 116 mm Rated power: 25 PS (18.4 kW) at 2000 rpm Maximum torque: 91.2 Nm at 1800 rpm Compression ratio: 19:1 Fuel quality: Diesel engine fuel with 44 CN Length 2835 mm Width 1570 mm Height 1600 mm Weight 625 kg (including extra weights) Propulsion Air-filled tyres Drawbar pull 1,500 kp (14.7 kN) Speed 20 – 25 km/h
Model: Porsche ‘Junior’ 109 G Years of manufacture: 1961 – 1963 Approximate number built: 2,500 (all variants) Max. speed: 20 Km/h Kerb weight kg: 1000 Total weight kg: 1600 Axle load f/r kg: 600 / 1000 L / W / H mm: 2560 / 1490 / 1500 Wheelbase mm: 1544 Gauge f/r mm: 1250 – 1650 / 1250 – 1650 Front tyre size: 4.00-16 Rear tyre size: 8-24 / 9-24 Service brakes: Drums at the back Steering brake: Yes Engine: Porsche Diesel Cooling: Air Cylinder: 1 Displacement: 875 cc Bore/stroke, mm: 98 / 116 Power at rpm: 15 hp at 2250 rpm Gearbox and drive: ZF A4, manual Gears f/r: 6 / 2 Ranges: 2 Output axle: Rear Differential lock: Yes
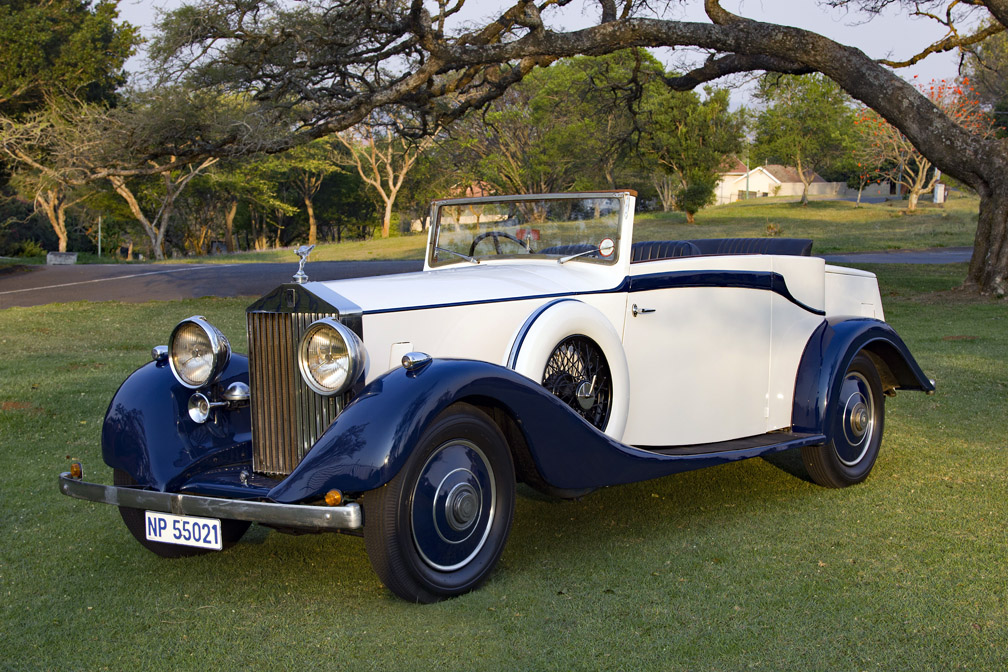
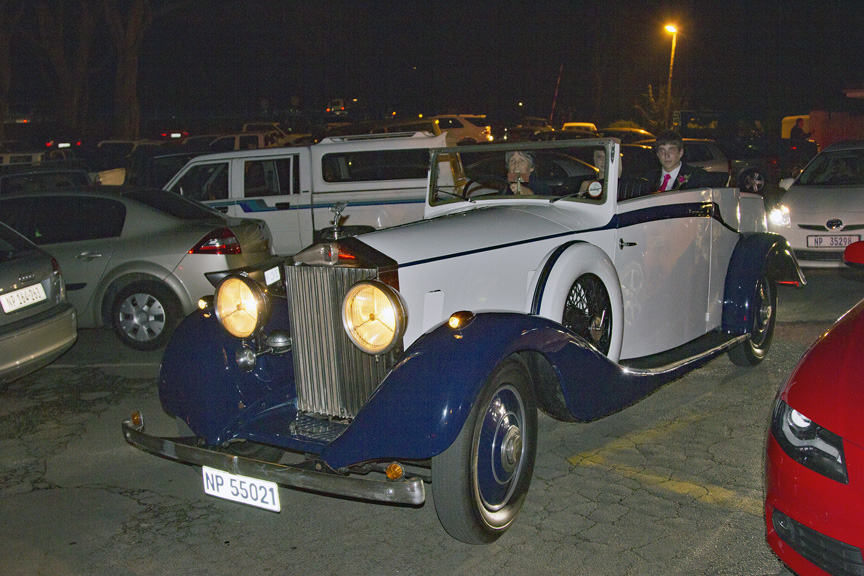
Body doubles, transplants and makeovers: 1936 Rolls-Royce 25/30 HP A regal beauty
Back before That War Rolls-Royce, and other vendors of upper-crust motor-cars, did things differently. Pre-empting the modern fad, for turning every feature a buyer wants into an “optional extra,” Rolls-Royce simply supplied bare engines and chassis’. Choice of coachbuilder, body style, and all the bits and bobs inside, was up to the buyer. He or she negotiated with a chosen body firm, typically Hooper’s or Vanden Plas, then let them get on with it and thereafter return the finished job to the dealer who did the final invoicing.
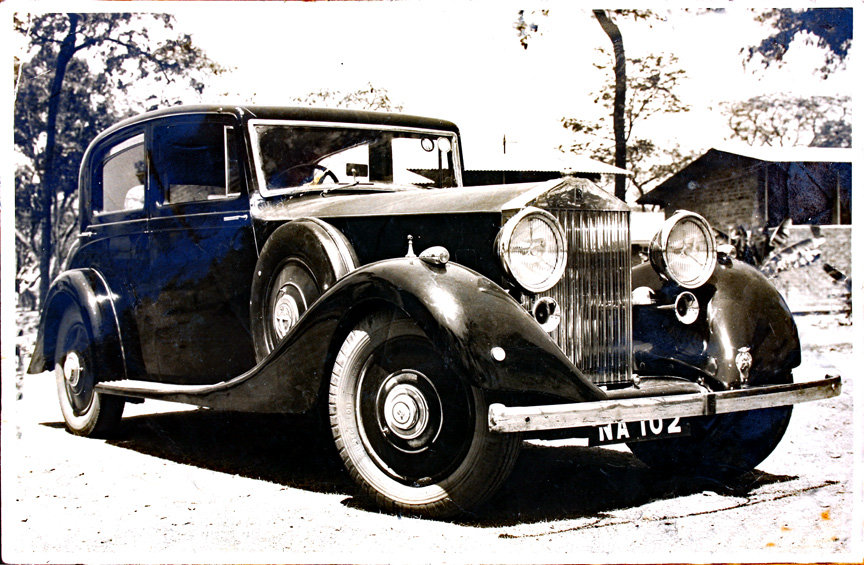
The earliest known picture of this car, taken at Ndola in 1956
So it was that Commander C.H. Davey, RN, requested that his Rolls-Royce 25/30, Chassis No. GXM68, be built by Vanden Plas and modelled after his existing 20/25 four-door, four-light, saloon. Messrs. Jack Barclay Ltd of Hanover Square, London W.1, invoiced the completed car out to him on September 16, 1936. Typical list price at the time was £1605 complete, although options included a sliding roof for £20 or a drop-window divider priced at £25.
The car’s history is vague after that, undergoing an engine transplant and swapping homes between gentry and commoners, until we pick up its trail on 25th August 1956. That was when Mr A.G.B. Skinner bought it for £445 from Conway Motors (Hove) Ltd, of 107 King’s Road Chelsea.
Mr. Skinner shipped it to Cape Town, on the Bloemfontein Castle, shortly thereafter and promptly drove it via what is now Zimbabwe to present-day Zambia. Possibly as result of a cracked cylinder head – it has known a few of those during its lifetime – the car suffered engine failure while on a rally in South Africa during 1959. It was railed back to Kitwe for repairs.
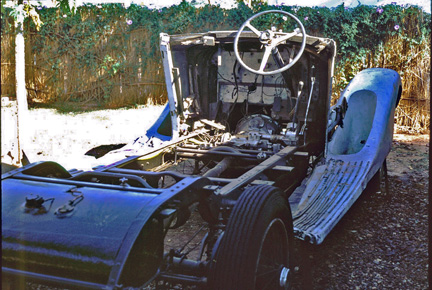
The body rotted away, its wooden frame crumbling to powder, in subsequent years and he finally sold the car somewhere around 1965. By 1970, Nature and scavengers had reduced it to an unrecognisable hulk. (Left)
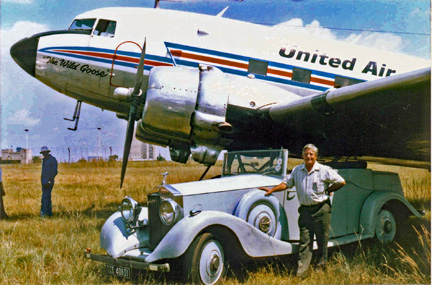
Then came salvation: In December of that year Captain Vic. S. Meakin, an airline pilot from Lusaka, Zambia, bought the car and set about restoring it. Originally a woodwork and metal-craft teacher before his career change, Vic Meakin was able to apply his considerable skills to restoring GXM68. He began the project soon after building a small workshop and carport in the back garden of his home in Lusaka. The engine overhaul came first – the list of parts required was long – there can’t have been much left of it when he began.
Five years of spare-time work later, the motor and chassis repairs were complete. He had also crafted a replica, Gurney Nutting-style, drop-head coupé body by adapting blueprints for a similar shell that had been designed for a Phantom 1. Nothing wrong with that; some humans have plastic surgeons resculpt their details with impunity. And there had always been body choices when the car was born.
But nothing came easily. In order to fabricate rear wings, for example, Vic first had to construct a wooden form and then hand-shape aluminum over that. The car eventually passed its roadworthiness test, in Lusaka, during June 1975.
Work in progress
The car was brought to South Africa in 1976 and used until late 1990 when Captain Vic ascended to the great hangar in the sky. GXM68 then passed to his daughter, ornithological artist Penny Meakin. Owing to more pressing issues in her life, however, it stood unattended because the recalcitrant cylinder head had developed hairline cracks yet again.
By then in Pietermaritzburg, work resumed during 2000 with a further attempt to repair the troublesome component. But several days had first to be spent releasing the clutch that should, apparently, have been ‘jacked out’ during storage. (Why does nobody tell one these things beforehand?). The rewelded head didn’t last very long, unfortunately, before water again contaminated the oil. The old warrior was off the road yet again. A replacement cylinder head was among many parts imported from UK suppliers or collected in the course of flying visits.
Penny’s husband, John Carlyon, regales anyone interested with an enthralling tale of one such trip that culminated in his arrival, in the “Items to declare” queue at OR Tambo International, sporting a pair of tyres looped over one shoulder. We may even post it someday. We did: https://oldcars.net.za/blog/2025/01/29/tyres-and-tribulations/
Once again restored, its current colour scheme was applied during March 2005 by M. Bizarre Panelbeaters in Pietermaritzburg. She is now a regal beauty in Volvo ‘Polar White’ with Rolls-Royce ‘Pacific Blue’ mudguards and stripes.
Penny’s heirloom has graced many shows, been written about in newspapers, transported blushing brides to weddings, ferried starry-eyed Matriculants to year-end dances, and now enjoys the pasture years to which every noble old Rolls is surely entitled.
Technical: Country of origin: England Number built: 1201 Engine: Inline-6, single-coil ignition Block and head: Cast iron Position: Front, Longitudinal Aspiration Natural Carburettor: Stromberg DC42 downdraft Fuel pumps: 2 x SU Electrics: 12V Rolls-Royce dynamo, starter motor, direction indicators and others Battery: 12V/60A/hr. negative earth Valvetrain: Pushrod Operated OHV Displacement: 4257 cc / 260 in³ Bore/stroke: 89 mm/114 mm Compression: 6.0:1 Power: 85.8 kw / 115 bhp at 4500 rpm Zero to 60 mph: 23.5 seconds Max. speed: Approx. 130 km/h / 80 mph Fuel consumption, driven hard, 17.2 mpg Fuel tank: 18 gallons Specific output: 29.4 hp Body / frame: Aluminium, over wooden frame Driven wheels: RWD Tyres: 600×19 cross-ply Brakes: Drums, front and rear, w/Servo Assist under licence from Hispano-Suiza Steering: Marles’ cam and roller Suspension: Semi-elliptic springs, hydraulic dampers, Live axle at rear Wheelbase: 3353 mm / 132 in Transmission: Four-Speed Manual, synchromesh on third and fourth Clutch: Borg and Beck single dry plate Gear ratios: 3.10:1, 1.98:1, 1.32:1, 1.00:1 Final drive: 4.55:1 Propellor shaft: Hardy-Spicer
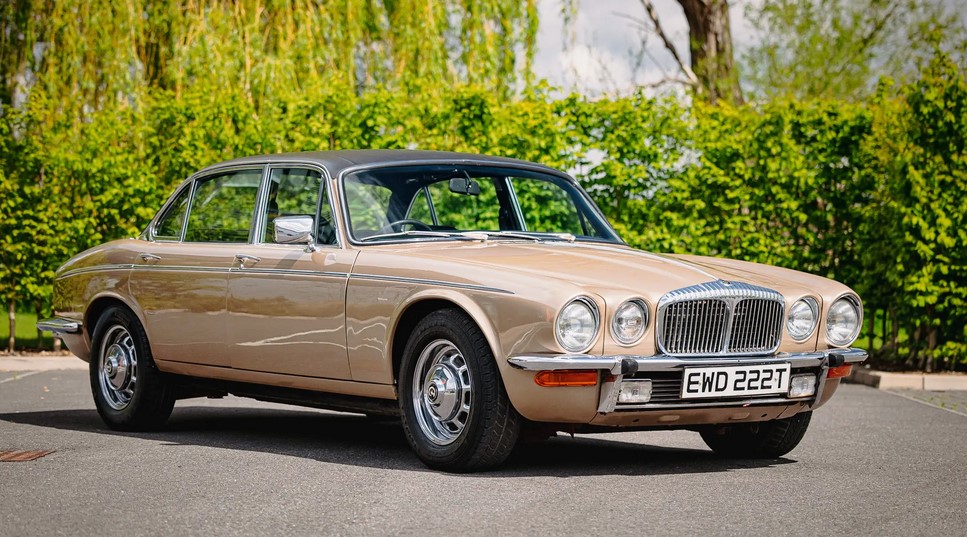
This article tells of how one couple adopted a 1973-1979 Daimler Double-Six 5.3 V12
This piece was written 21 years ago by a friend who is sadly no longer with us. As an “acquisition tale,” it’s a little different from the usual style of such things and certain details are perhaps not to be recommended. But it’s a cracker nonetheless.
Geoff is my friend and neighbour. Even if he were not, I’d always be nice to the grumpy old codger because he has a beautiful, white E-type coupe in original, pristine condition. One day he may let me drive it. I hope he reads this.
On a warm winter’s day, in April, he and I set off from Nottingham Road, bound for the Cannon and Cannon Vintage Car Auction in Hilton. I had been there two days previously, when my eye had fallen upon a red 3.8 Mark 2 (Inspector Morse type) Jaguar. On closer inspection it was a bit of a “paint job”, but possibly worth a bid if it went cheap. It did not so I did not.
In passing I had noticed a golden Daimler Double Six with the bonnet up (usual mode). A quick glance revealed that the fan-ventilated battery-box was missing; so I looked no further. My mild interest stemmed from having driven my late father’s Double-Six in the ’80s. He had purchased it almost new, in part exchange for his old Sl Bentley.
Five years’ hard work finished off the Double Six; I suspect the Sl is still running. If someone has up-graded the front dampers and put on radial tyres, it may even be possible to drive it in a straight line and not have to avoid the cats’ eyes in order to do so. After 20 years’ use, the Sl sold well. After 5 years, the re-sprayed Double Six did not. British Leyland/Daimler/Jaguar designed some good cars; such a pity they could not build them so well.
At the Auction, the Double Six with bonnet down (unusual mode) had good, clean, upholstery and the original paint. As I looked into the boot, someone started the engine. I did not get covered in black exhaust. It runs; it is golden and good to drive, as fond memories remind me. The bonnet is up again and I discover the catch is faulty, which explains a lot!! I peer in, and mention to another peerer, that the battery-box is missing. A long explanation follows and I am shown a secondary electric cooling fan fitted for South African models.
We chat on: he must have been a Jaguar-Daimler Club member. He was polite, shaven, well dressed, probably rich, and far worse than all this, assumed I knew the engine well. I actually only knew the results of this monster; complicated, quiet power coupled with an insatiable thirst. The day was hot and time to attend to my own thirst.
Then I met the owner’s brother, the vendor himself, living in England and only using the car for a few weeks each year. The auto dealer who had had the Golden Monster in his showroom in Durban was also there. I talked to someone who had tried to buy it and sleuth (me) discovered how much he had offered, and had been refused.
I’m beginning to get excited, but must not show it. I think: “Don’t look at the car again or they’ll be on to you.” I eavesdrop on a conversation, “The gear box has been re-conditioned for R12,000 in Johannesburg.” The bidding starts. I melt to the back of the crowd, not easy when you are over six foot and weigh 18 stone.
I do not bid. In increments of R500, the price is rising steadily and so is my passion to possess this limousine. There is a pause in the bidding, I whack in a bid of R2,000 over the last offer. David Cannon bangs his clipboard shouting, “Sold to Mr. King at the back, but subject to the vendor’s confirmation”. I never saw the dealer or the vendor’s brother again …
A golden Daimler Double Six is back in the family … sign this … go to the office … the number plates are not included … sign again. Help, where is Geoff? Will he refuse me a lift home? Is he furious? Who cares; it will be nothing to what my first passion, my wife Chris, will say, when I tell her what I have done. Her last words, still ringing in my ears were, “Enjoy yourselves. Don’t buy anything”, but then the ‘phone rang and I was saved from answering her.
The next task is a plea to Cannon and Cannon to help preserve my marriage, if not my sanity (too late for that!) and let my Daimler stay until Monday – four days. They agree; they are fabulous people and they know Chris too! Geoff drives me home to the front door and promptly puts foot to his Mercedes Kompressor (coward) leaving me to face the storm.
It rages for a couple of days but there are calms and sunny periods. On day four we collect my passion and Chris almost smiles when she sees it. She concedes that she understands why I felt the passion, even if she cannot agree with my priorities. “You promised not to buy anything.” “Oh, No! I didn’t. You asked me not to buy anything, but I made no promises.” . . . . and so it went on, for hours.
When we arrive at the Country Club the golden monster attracts much interest. The bonnet opens un-aided and the crowds peer inside. Chris tries not to be impressed. At a Bonnets Up in Durban, I explain to all present the technicalities of the V12. Do they believe me? Are they just being polite, or are they as ignorant as I am?
Four months on, my passionate wife and I share this gilded chariot. Six months on, I refuse three times what I paid for it.
Does anyone in the club have a bonnet catch for sale? If so, please contact my wife. By e-mail.
-John King
================================================== Some technical details: Country of origin: GB United Kingdom
Make: Daimler (U.K.)
Model: Sovereign XJ Series II 1973-1979 Submodel: Double Six Series II 1973-1979 Class: full-size luxury / luxury car Body style: sedan Doors: 4 Traction: RWD (rear-wheel drive) Dimensions & capacities Length: 4945 mm / 194.7 in Width: 1770 mm / 69.7 in Height: 1375 mm / 54.1 in Wheelbase: 2865 mm / 112.8 in Front track: 1473 mm / 58 in Rear track: 1488 mm / 58.6 in Ground clearance: 178 mm / 7 in Turning circle btw. kerbs 11.9 m / 39 ft Drag coefficient Cd estimated by a-c: 0.46 Frontal area A estimated by a-c: 2.02 m2 Drag area CdA estimated by a-c: 0.929 m2 Trunk (cargo) capacity claimed: 481 lit/ dm3 Boot length: 902 mm / 35.5 in Boot width: 1130 mm / 44.5 in Kerb weight (without a driver): 1870 kg / 4123 lbs Powertrain Engine manufacturer: Jaguar V12 5.3-Litre Engine type: spark-ignition 4-stroke Fuel type: gasoline (petrol) Fuel system: 4 carburettors Zenith-Stromberg 175 CDSE Charge system: naturally aspirated Valves per cylinder: 2 Cylinders alignment: V 12 SOHC Displacement: 5343 cm3 / 326 cui Bore: 90 mm / 3.54 in Stroke: 70 mm / 2.76 in Compression ratio: 9 : 1 Horsepower net: 186.5 kW / 254 PS / 250 hp (DIN) / 6000 rpm Torque net: 408 Nm / 301 ft-lb / 3500 rpm Fuel capacity: 91 litres / 24.1 U.S. gal / 20 imp. gal Drivetrain Gearbox: Borg Warner BW 12 Transmission type: automatic Number of gears: 3 Standard tyres: 205/70 VR 15 Performance – Factory claim Top speed: 225 km/h / 140 mph 0-60 mph (s): 7.5 0-100 km/h (s): 7.9